Kartra Beginner Tutorial: How to Get Started with Kartra in 2023
Heads up: I use affiliate links for my fave products. If you click and purchase, I may receive a small commission at no extra cost to you.

HIT PLAY OR READ THE POST BELOW:

WRITTEN INSTRUCTIONS:
Kartra is a powerful all-in-one sales and marketing tool that runs the entire backend of my business. It is so convenient to have everything all in one place, so I'm really excited to show you how you can get started with this tool today as well!
If you are a coach, a course creator, or a membership site owner, you are going to absolutely love this tool. It's going to allow you to sell your products, build your email list, create an affiliate program, host your online courses, and so much more.
If you're new here, hi, I'm Louise! I've been using Kartra for many years now, so I have a lot of tips and tricks to share with you, so make sure that you grab my free Kartra roadmap here!
And I also have a link for you to get 30 days of Kartra for just $1.
There's so much you can do with Kartra. I'm not gonna be able to cover it all in one video, but today I'm gonna show you:
how to set up your products for sale
how to email your list
how to use the page builder so you can create sales pages and landing pages
how to set up courses or memberships.
Alright, let’s dive in!
So once you click my link, which is my affiliate link (thank you so much for using it). Once you click that, it's going to open up this page:

So you can start with a dollar 30 day trial for any of the plans. Now the main difference is going to be dependent on how big your email list is.
If you are coming in from another tool and you already have 10,000 people on your email list, for example, then you're going to want to go with these silver plans. If you are just getting started though, the starter plan is fantastic. So I'm just gonna click “start my trial” and I'm just gonna fill in my billing info and pay that $1.
Once you've signed up, you're just going to enter in your email address and password. Agree with the terms. And then I would just click, “No, thanks. I'm ready to go to the dashboard.”
So this is what the backend of Kartra looks like:

Now they do have a lot of pre-made campaigns, so that's what it was prompting you for.
If you go over to “campaigns” and then “available campaigns”, you will see all these different funnels that are already created for you. This can be confusing to start with so I'm just gonna walk you through from scratch how we do things.
Setting Up A Product For Sale In Kartra (Courses, Coaching, Memberships) 💰
So first things first. Let's go through how to set up a product for sale. So you're going to go into “integrations”, and you're going to want to set up Stripe or PayPal, or both. I personally do both. If those platforms are not available in your country, you'll see that there are also other payment processors that you can use.
But you definitely, you have to have some form of payment processor in the backend. These are very easy to connect though.
Once you've done that, you're gonna go over to “products” and then click “new product”. You'll see that with Kartra you have the option to do “main products”, “upsells” or “downsells”. The capability is so strong!
You can do pretty much everything that you've seen in YouTube videos about marketing you can do within Kartra, but I'm going to keep it simple right now.
So let's set up the main product and let's pretend that we're selling an online course. I'm gonna call this “online course”. Hit next. And then you just need to fill in the information. So this is my “online course”, type in my description, then you can also change the image here (I would upload a square image of your logo, and that will look great), hit the check mark, then “confirm”.

Now there are gonna be a lot of settings. I'm just gonna show you exactly how I would do this, and how I would set it up.
For example, yes, you can list in the Kartra marketplace, but I just keep mine private and promote myself. So I'm gonna hit “save”. Then once you integrate your payment processors, you're simply going to choose your account from the dropdown.
Okay, so if you connect PayPal and Stripe, you'll have PayPal here. Then, to connect these, you're just going to select them from the dropdown menu. Since we haven't done that, we're just going to click “configure later”, click “save”, and “next”.
Now here is where you're going to set up the pricing for your product:

So let's say we're doing $997… then I would just do one payment of $997, and then you're gonna type in $997 here. Okay. Looks good. Hit “save”.
Now, long the side here, you can add as many different payment plans as you want. So I could click on the plus sign and I could choose to do a payment plan instead. That would be instalments, and I could do something like three monthly payments of $400. Three instalments and you can choose when those instalments re-bill (so I would choose monthly here and then hit save).
Next is shipping costs, but because this is a digital product, you do not need to worry about that.
For sales tax, speak to your accountant for what you need to set up there.
And then you can decide what your refund policy is. You have a few options here, so let's just say we're doing “no refund”. Hit save.
Next, we have pages. What you can do for this is you can just click “configure later” and then we'll go ahead and create this after.
So I'm going to configure this after and configure our thank you page.
And what's great is that it’s gonna be red here (below). So it's gonna alert you to everything that you need to go back and fill out:

Now, by default, they are going to generate a checkout page for you. So what you can do is you can just choose which look you like the best.
For the most part though, I'm creating a custom sales page (which I'll show you how to do), but it's definitely convenient that it will generate a page like that.
Okay, so as I said, I'm gonna skip over a few things that you don't even need to customize or change: For the address, I don't actually ask for the full address (I don't really need that). I just do city, postal code, country and state.
If you want your customers to have to agree to terms before they purchase, then you can absolutely do that here. So then you have “yes. Require them to agree”, and then you can fill in your terms and exactly what those are. You can paste those in there.
Then we have post-sale - this is where you are going to add people to the correct list and tag. So you'd go “change”, and then you would go ahead and create a new list for people that have purchased your course. For example, “online course student” so that once they purchase this, they are added to the correct list.
So you can add them to the list and you can also tag them.
Then from here, this is how we will grant them access to your product:

Now, you can sell anything with Kartra, okay? You can sell online courses, memberships, your one-on-one coaching, an ebook. You can do any of those things!
So if it's a course or membership, you're going to use “Kartra membership”. If it's a downloadable file, you can use “downloadable file”, or sometimes there's not actually going to be a page you need to give them right away so you can turn that off (and select “no access page”). Then, we're gonna hit save.
You also have the option for advanced automations. But I'm gonna hit “save and next” for now.
Now, what's very cool is that you can have a full affiliate program through Kartra. That means any happy student of yours or any industry partner that you have can get on board and promote your product and receive a commission for doing so! So that is what this would be:

But for now, we're just gonna hit “save and next”.
There are a few more steps that you need to complete in order for that to be done, but that is how you set up any product for sale!
Email Marketing in Kartra 💌
Next, I wanna show you communications! If you go into “communications” and then “communications” up here, you'll see we have broadcasts, sequences, and automations.
If you just want to send a general newsletter style email, you'll do so from the “broadcast” tab.
If you want to set up an automated email sequence (whether that's a welcome sequence for any of your new students or a sales funnel), you'll use “sequences” and
”automations” is a way of you linking things together. So it's really quite powerful!
Let's go into broadcast though, so I can show you what it's like to use their email builder. So I'm gonna click the plus sign to create a new broadcast, then I'm going to hit “create”, “send by email”.
Now, for your emails to work, you do want to integrate in a professional email address. So by professional I mean it's not your Gmail account. You want something like your name@yourdomain.com. And you will connect that under “integrations”.
So once you do that, this is what it will look like:
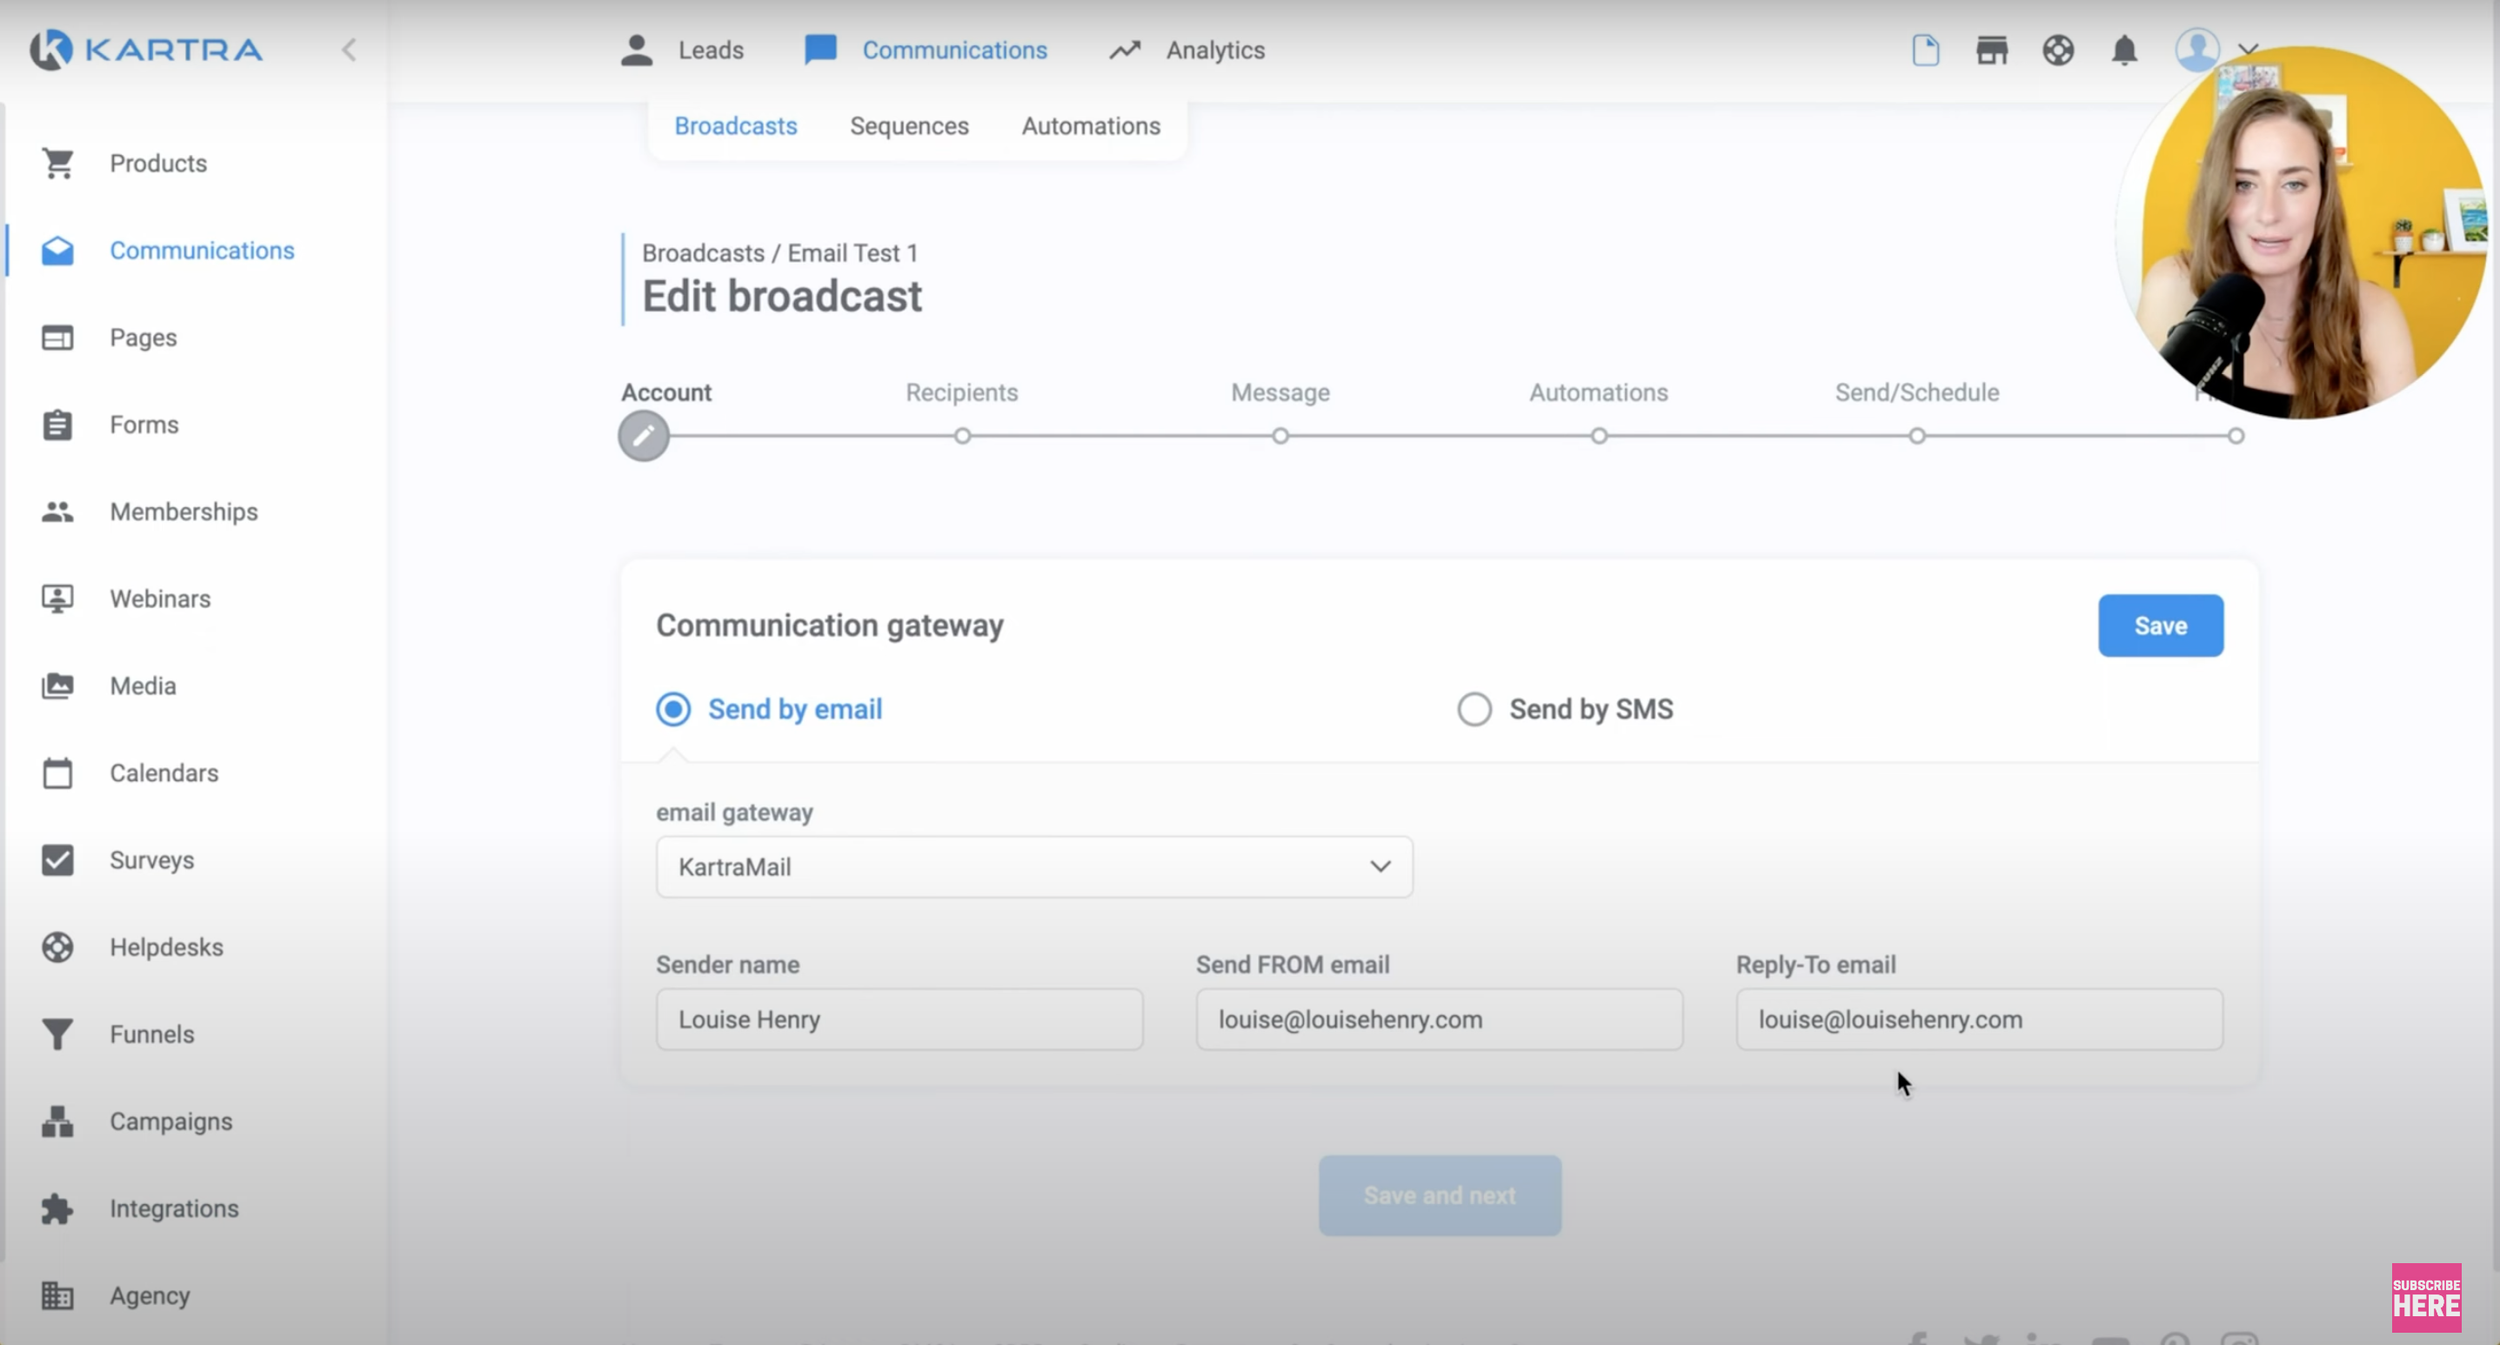
You can see my name and then you can see my professional email here.
I'm gonna hit “save and next”, and then I'm gonna choose my recipients. Now, obviously right now we don't have anyone on our list. What's very important is that you don't just email any lead in Kartra. Kartra will store your leads even if they have unsubscribed. So just make sure that you are always emailing someone that is in fact subscribed to one of your lists. For this example, we're gonna have to add a lead just so that they'll let us do an example:

Now we can continue on, and then you'll see that you can send either a single email or you can split test, which is really cool. So that's gonna allow you to test two different designs. You can also do this for different pages, or for different subject lines.
There's a lot of different ways you can use that, but for now, I'm just gonna go “single email”. Now you'll see there's a very simple email builder by default:
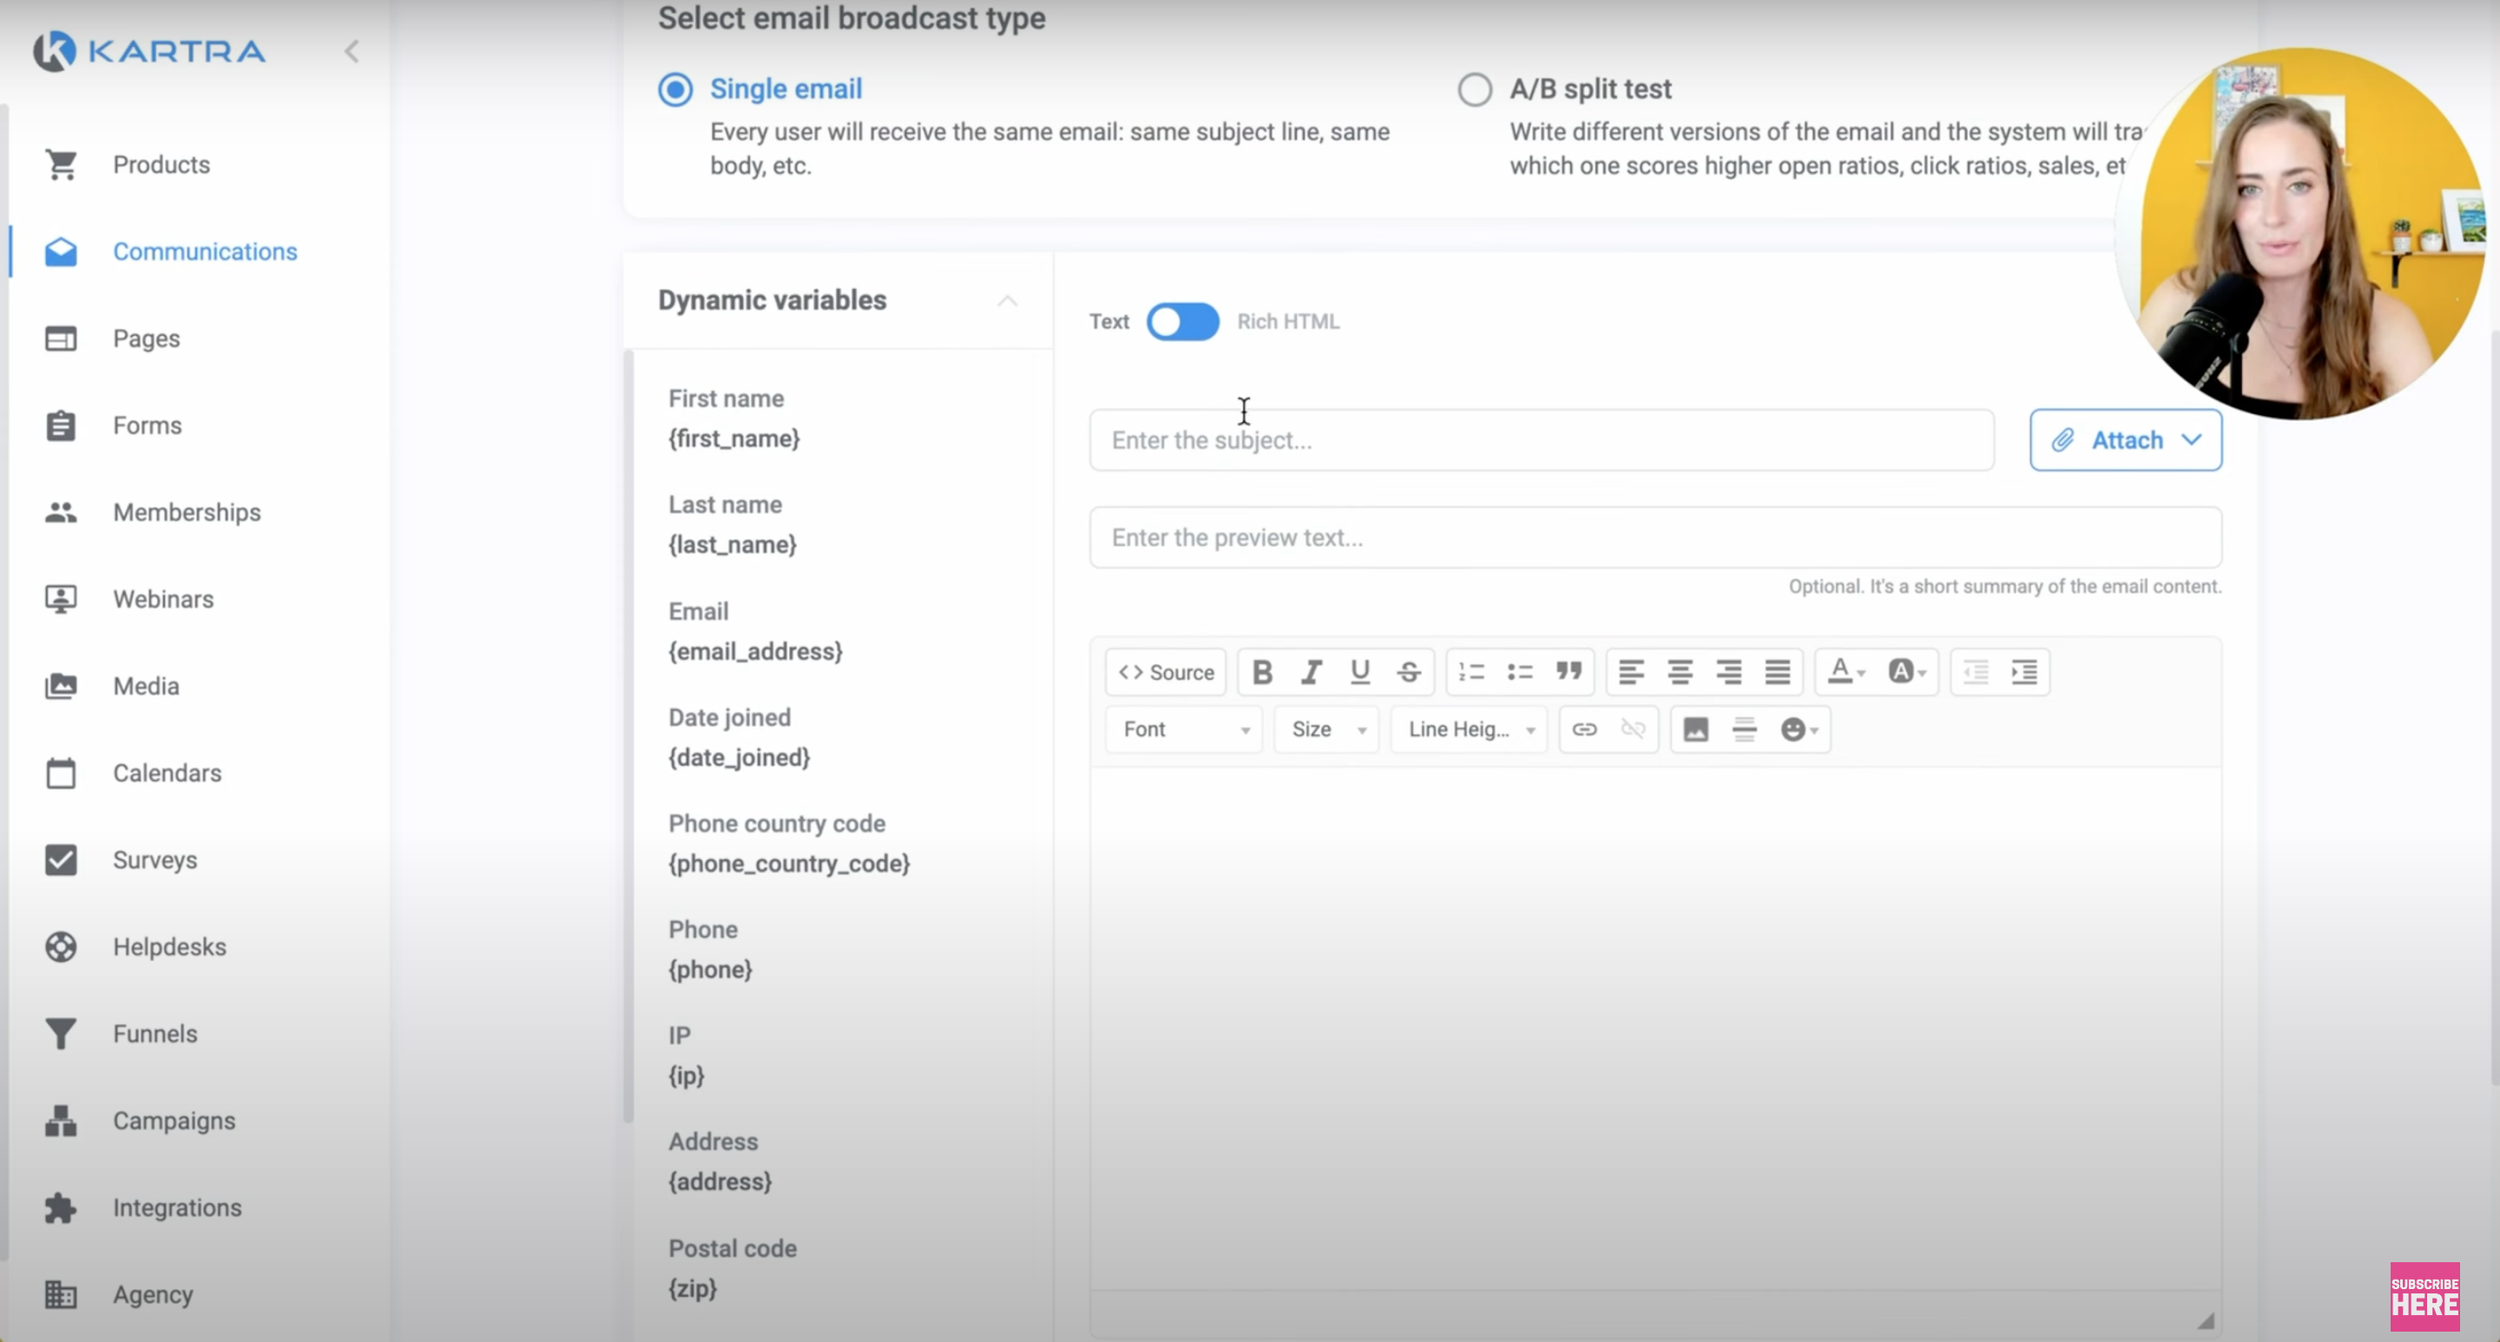
But if you switch this over here to Rich HTML, then it's going to unlock all these different blocks:

And so basically this is just drag and drop and you can create a really nice looking email.
So for example, I could go over here, I could add in an image, then I could add in a button. It's very easy to actually construct the email itself. I'm gonna drag in some text underneath that, and then I just click on it and then I customize my text.
And as you can see, this little edit bar comes across the top actually so I can change a lot there as well. I can change the font size, the color, and more.
So on top of that, you'll actually see full templates up top here, and you can just drag in email templates and customize those. And each thing is generally very easy to customize. For example, with the button, we're gonna hover over it, then click on the pencil icon, and change our background colour to whatever we want it to be. And you can create a palette and you can store all of your brand colours so that you don't need to manually choose that each time.
Okay, so I'm gonna enter in my subject line. I can add preview text if I want. I can change what the background colour of this canvas area is. So if I wanted that to have bit more colour to it, I can certainly do that.
Then you can send a test email to yourself just to see what it will look like, so that's a good best practice to test that.
One quick bonus tip: You know how you can customize emails with your subscriber's first name? All you have to do is go over to text, drag in a text block, then you're going to go to “Dynamic Variables”, copy the line Kartra provides, and paste that in. So now that you have that in place, that is going to automatically populate with your email subscriber's first name!
This is pretty much how you would set up an email!
You're gonna click “save and next”, then “save and next again”, and then you can either send it now, schedule it for later, or simply save it as a draft.
That same email builder is exactly how you would customize each email in your sales funnel as well.
Also, I want to mention, don't worry if you have already built your email list on another platform, you can import that into Kartra! To do that, you would just click on the plus sign here:

Select “import a batch of leads”, and then you can upload a CSV file here of all of your subscribers. That is easy to get from any email marketing platform. You're able to export your list and that will export as a CSV. The only thing to keep in mind here is it does have to be approved by Kartra, so just give yourself time to get all of those emails in.
Building Pages in Kartra (Sales Pages, Landing Pages) ✍️
Now let's go over to the page builder! You're going to click “pages” and then to create a new page, click on the plus sign.
You will see all these different templates here for you to choose from, and this can be a really great place to start. And as you can see, we have “squeeze pages”, otherwise known as a landing page. This is what you would use anytime you want to build your email list. So if you have a free pdf, a free training, free challenge, anything like that, then you're going to use a squeeze page or a landing page.
And then you'll also want to use a sales page. Okay, so the sales page, this is what you'll use to actually sell your full product.
You can go over to these templates and you can click “preview”, open it up, and see what it looks like.
Now, it’s important to know that you can get your page to look however you want. It's super customizable in Kartra. Any one of my sales pages has been created in Kartra, so let me show you those! This one here was built in Kartra, so is this one, and this one here.
So these templates are just a starting point. Every single thing about it, the colours, the photos, the graphics, everything can be customized. Let's say that you like this page here, you're just gonna click select, give this a name, and when you're doing this for real, make sure to organize all your pages.
All right, so this is what the page builder looks like in Kartra:

The first thing you want to do is go and turn on “autosave”. Then you won't lose anything. Now with all of the elements, you're mostly just going to hover over it, and then you'll see these different icons come across the top that allow you to customize this.
Whenever it's text, you wanna click on the “t”, and then you can simply highlight it and add in your text instead. If you ever find that with text it's not actually a text block, it might just be an image, which is what this one is. In that case, you can simply click on the pencil icon and upload your own image.
What we're doing for the most part is we're using Kartra’s page builder and doing as much as we can in there, but if we ever have something a bit more fancy, then we are designing that in Canva, (the free graphic design tool that is amazing). We're designing it there and then uploading it into Kartra and displaying it on our pages.
So if it's ever something like that, you can replace it or you can hover over it and click on the “X” to delete it. So for any of these examples on the templated page, I'm just going to double click and then add in my text.
Now, what's cool about Kartra is that it’s all drag and drop, right? I can go over here to the first and I can move everything around. So you'll see all these different orange lines that's showing you where you could drop that text, and then I can simply come over here and I can move it down there.
Now, obviously follow their template for the most part - their template is going to be great. But, just so you know, it is all drag and drop.
Now this button, right now, it is very close to this text here. If you wanna change that, hover over the button, click on the pencil icon and you'll see margin. All you have to do is increase this, then scroll down, hit “apply”, and that's going to create that more of a gap. But even as we look at the button here, you'll see just how many options you have for customizing.
That's what I mean by pages are super customizable, right? I can change the colour, I can change the type, whether the buttons are round or not, whether there's a shadow - there's a lot! Then, just always look across the top. This is how you would change the text, what the button actually says, and the link (that is how you would control where it links to).
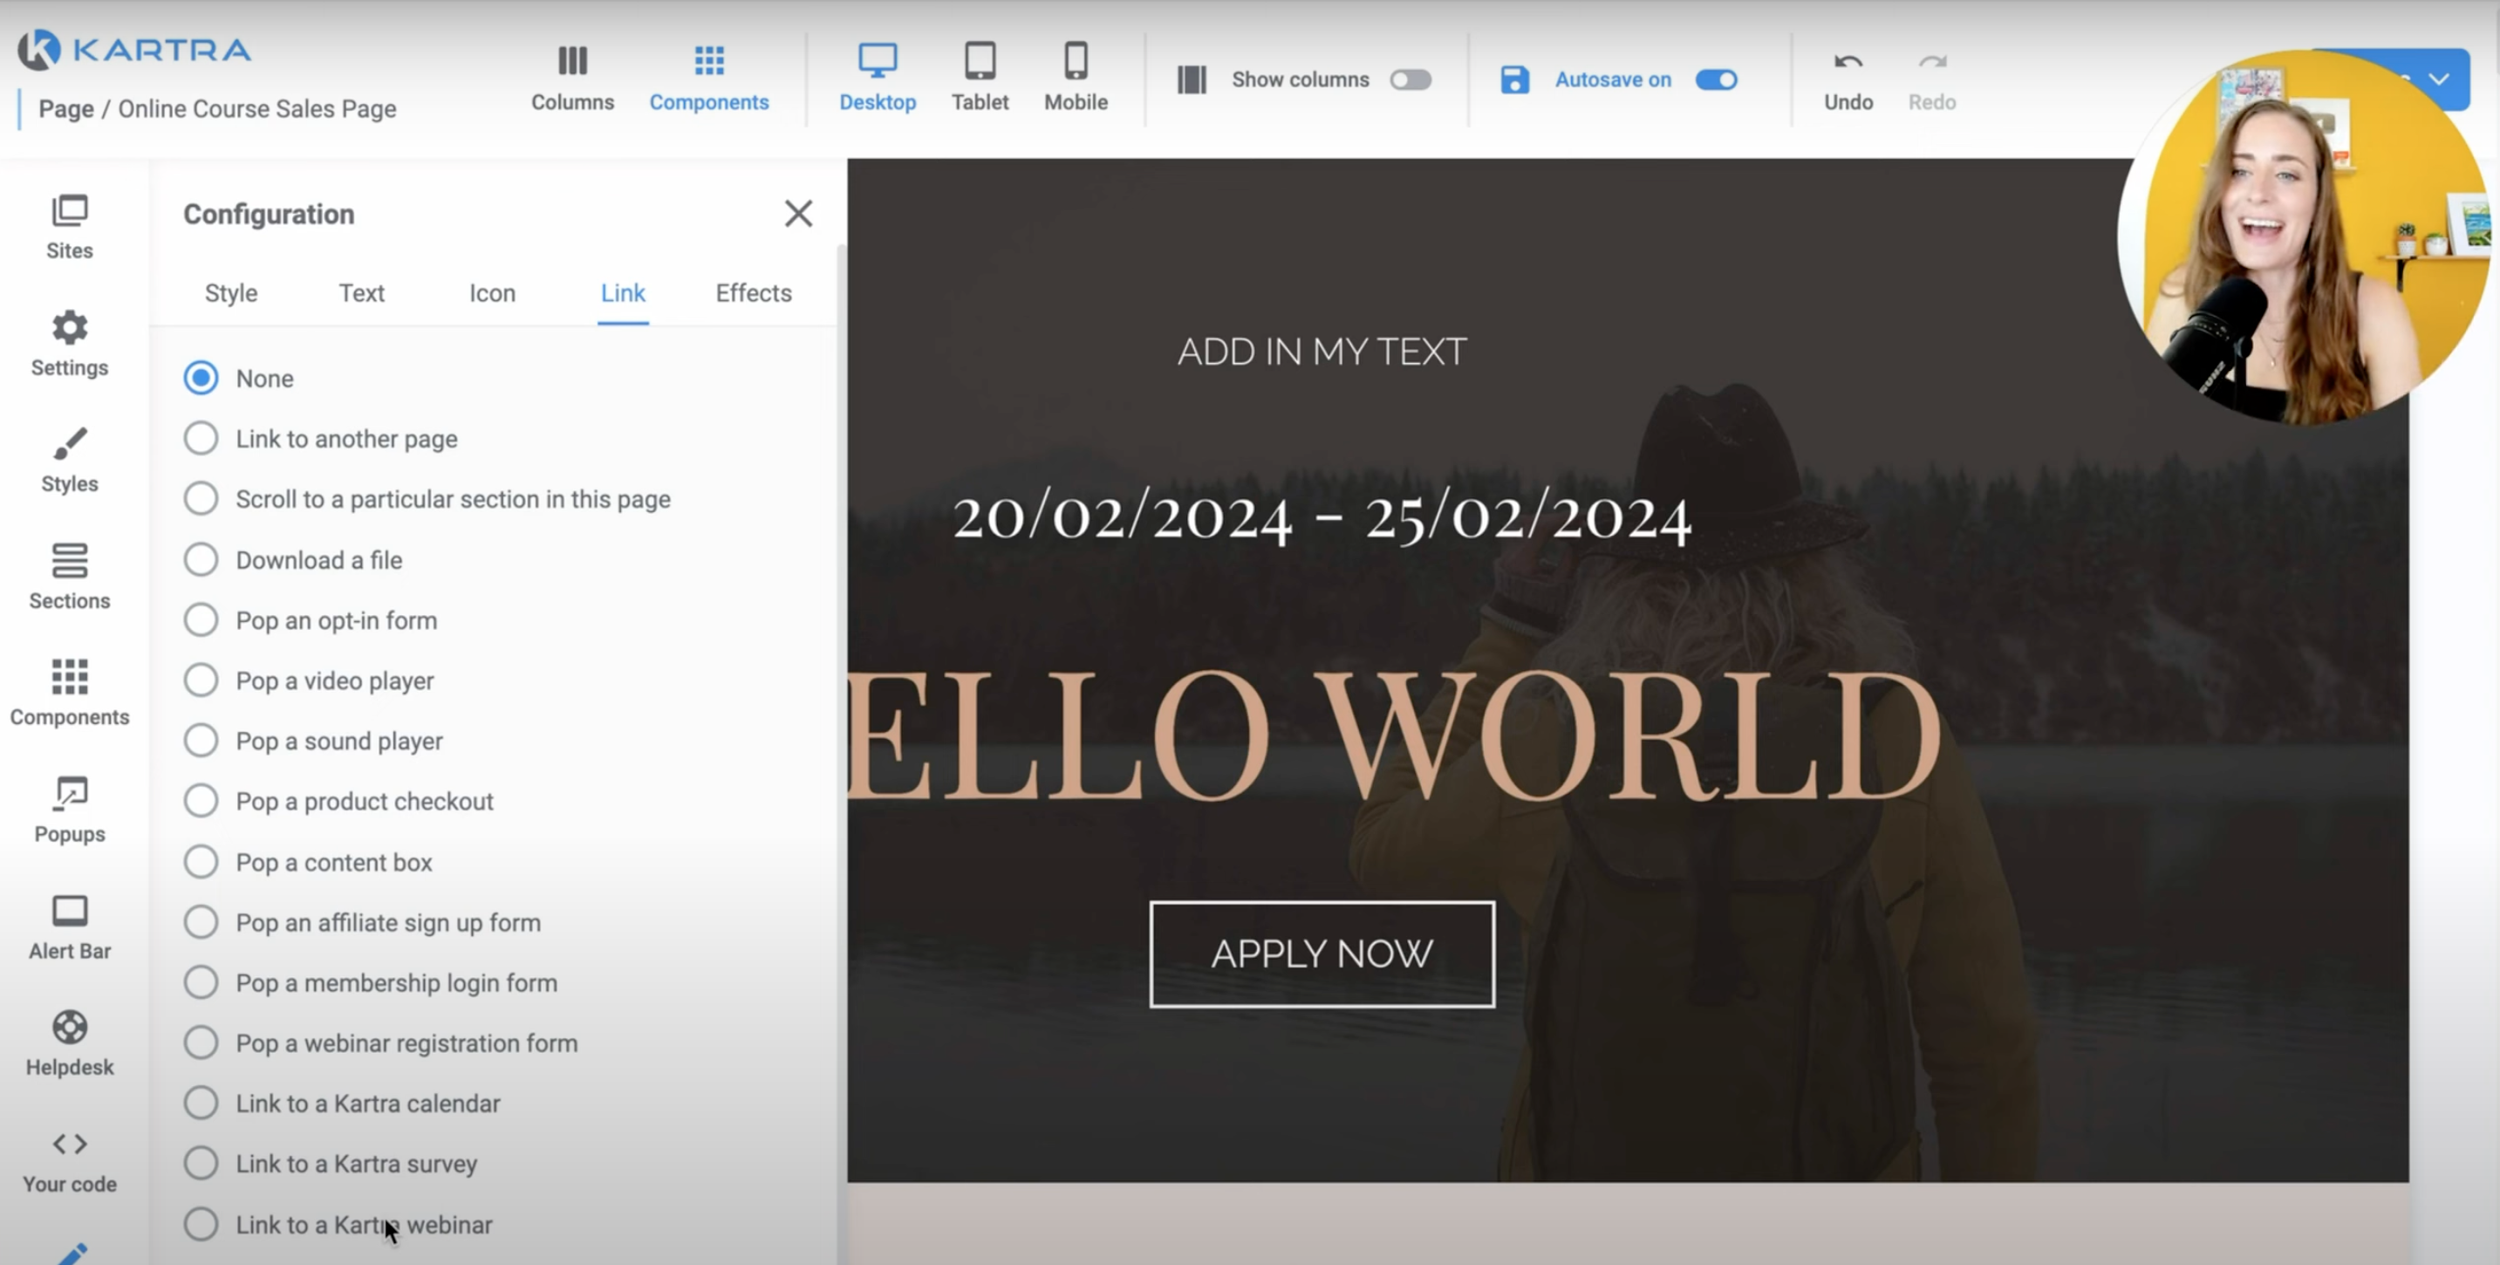
And what's cool about Kartra is everything is interconnected, right? So I could then pop up a product checkout that we've created. That is how you then turn this into a sales page!
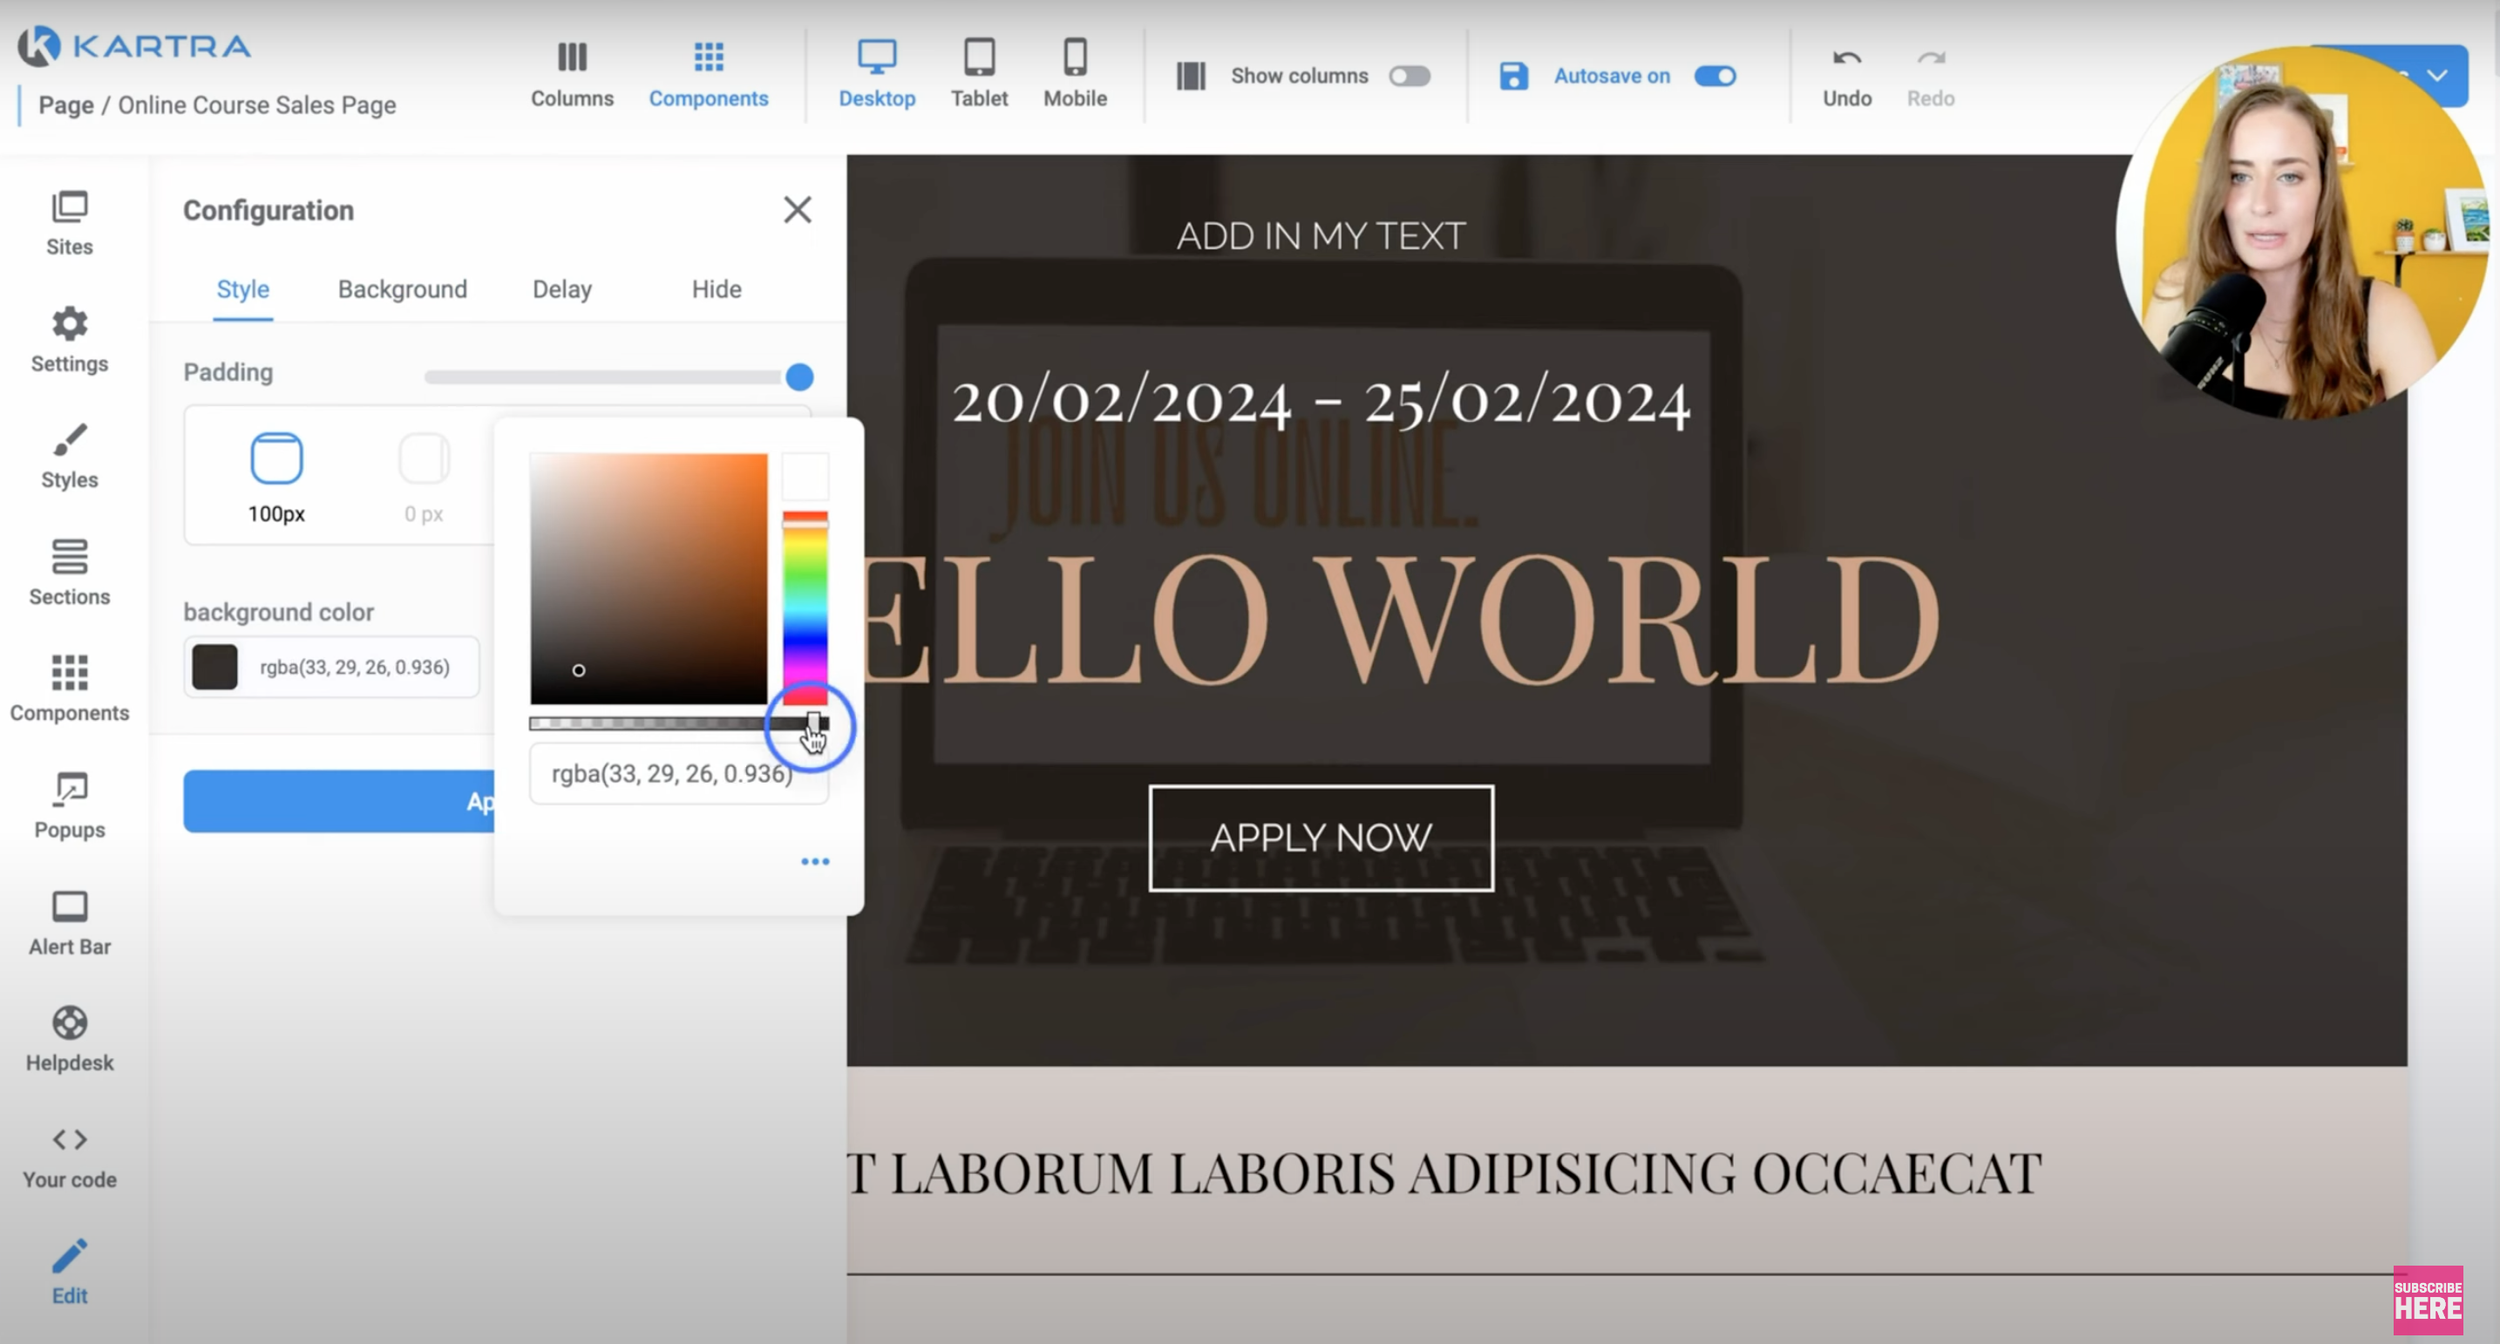
Now, for any background details, if you come over here, you'll see a blue gear icon, click that, then click “edit”, and then that is how we control the background.

Now, right now, this has a background colour, but if you click “background”, it also has an image. So you could go ahead, click “edit”, and you could replace this with your own image. You can upload your own here:

You can also go to royalty free images and you'll see all these different images that you can use or search from. So let's try “laptop”, see what comes up. Okay, cool. So all these different images that we can choose:

So I'm just going to choose one, and click “add”. And that's going to upload to the background of this page. Then I just need to hit the check mark and hit “confirm” and “apply”.
In Kartra, just remember, they do make you confirm and then apply it. I think in the future they could maybe eliminate some steps like that, but you'll get used to it. It's totally fine.
So the background color right now is this dark black. If I want to increase the transparency I can by dragging this over:
Okay, and at any point to undo what you've done, just go to the top, click “undo” and change it back.
Then you're gonna scroll down. This here, this is an image block:
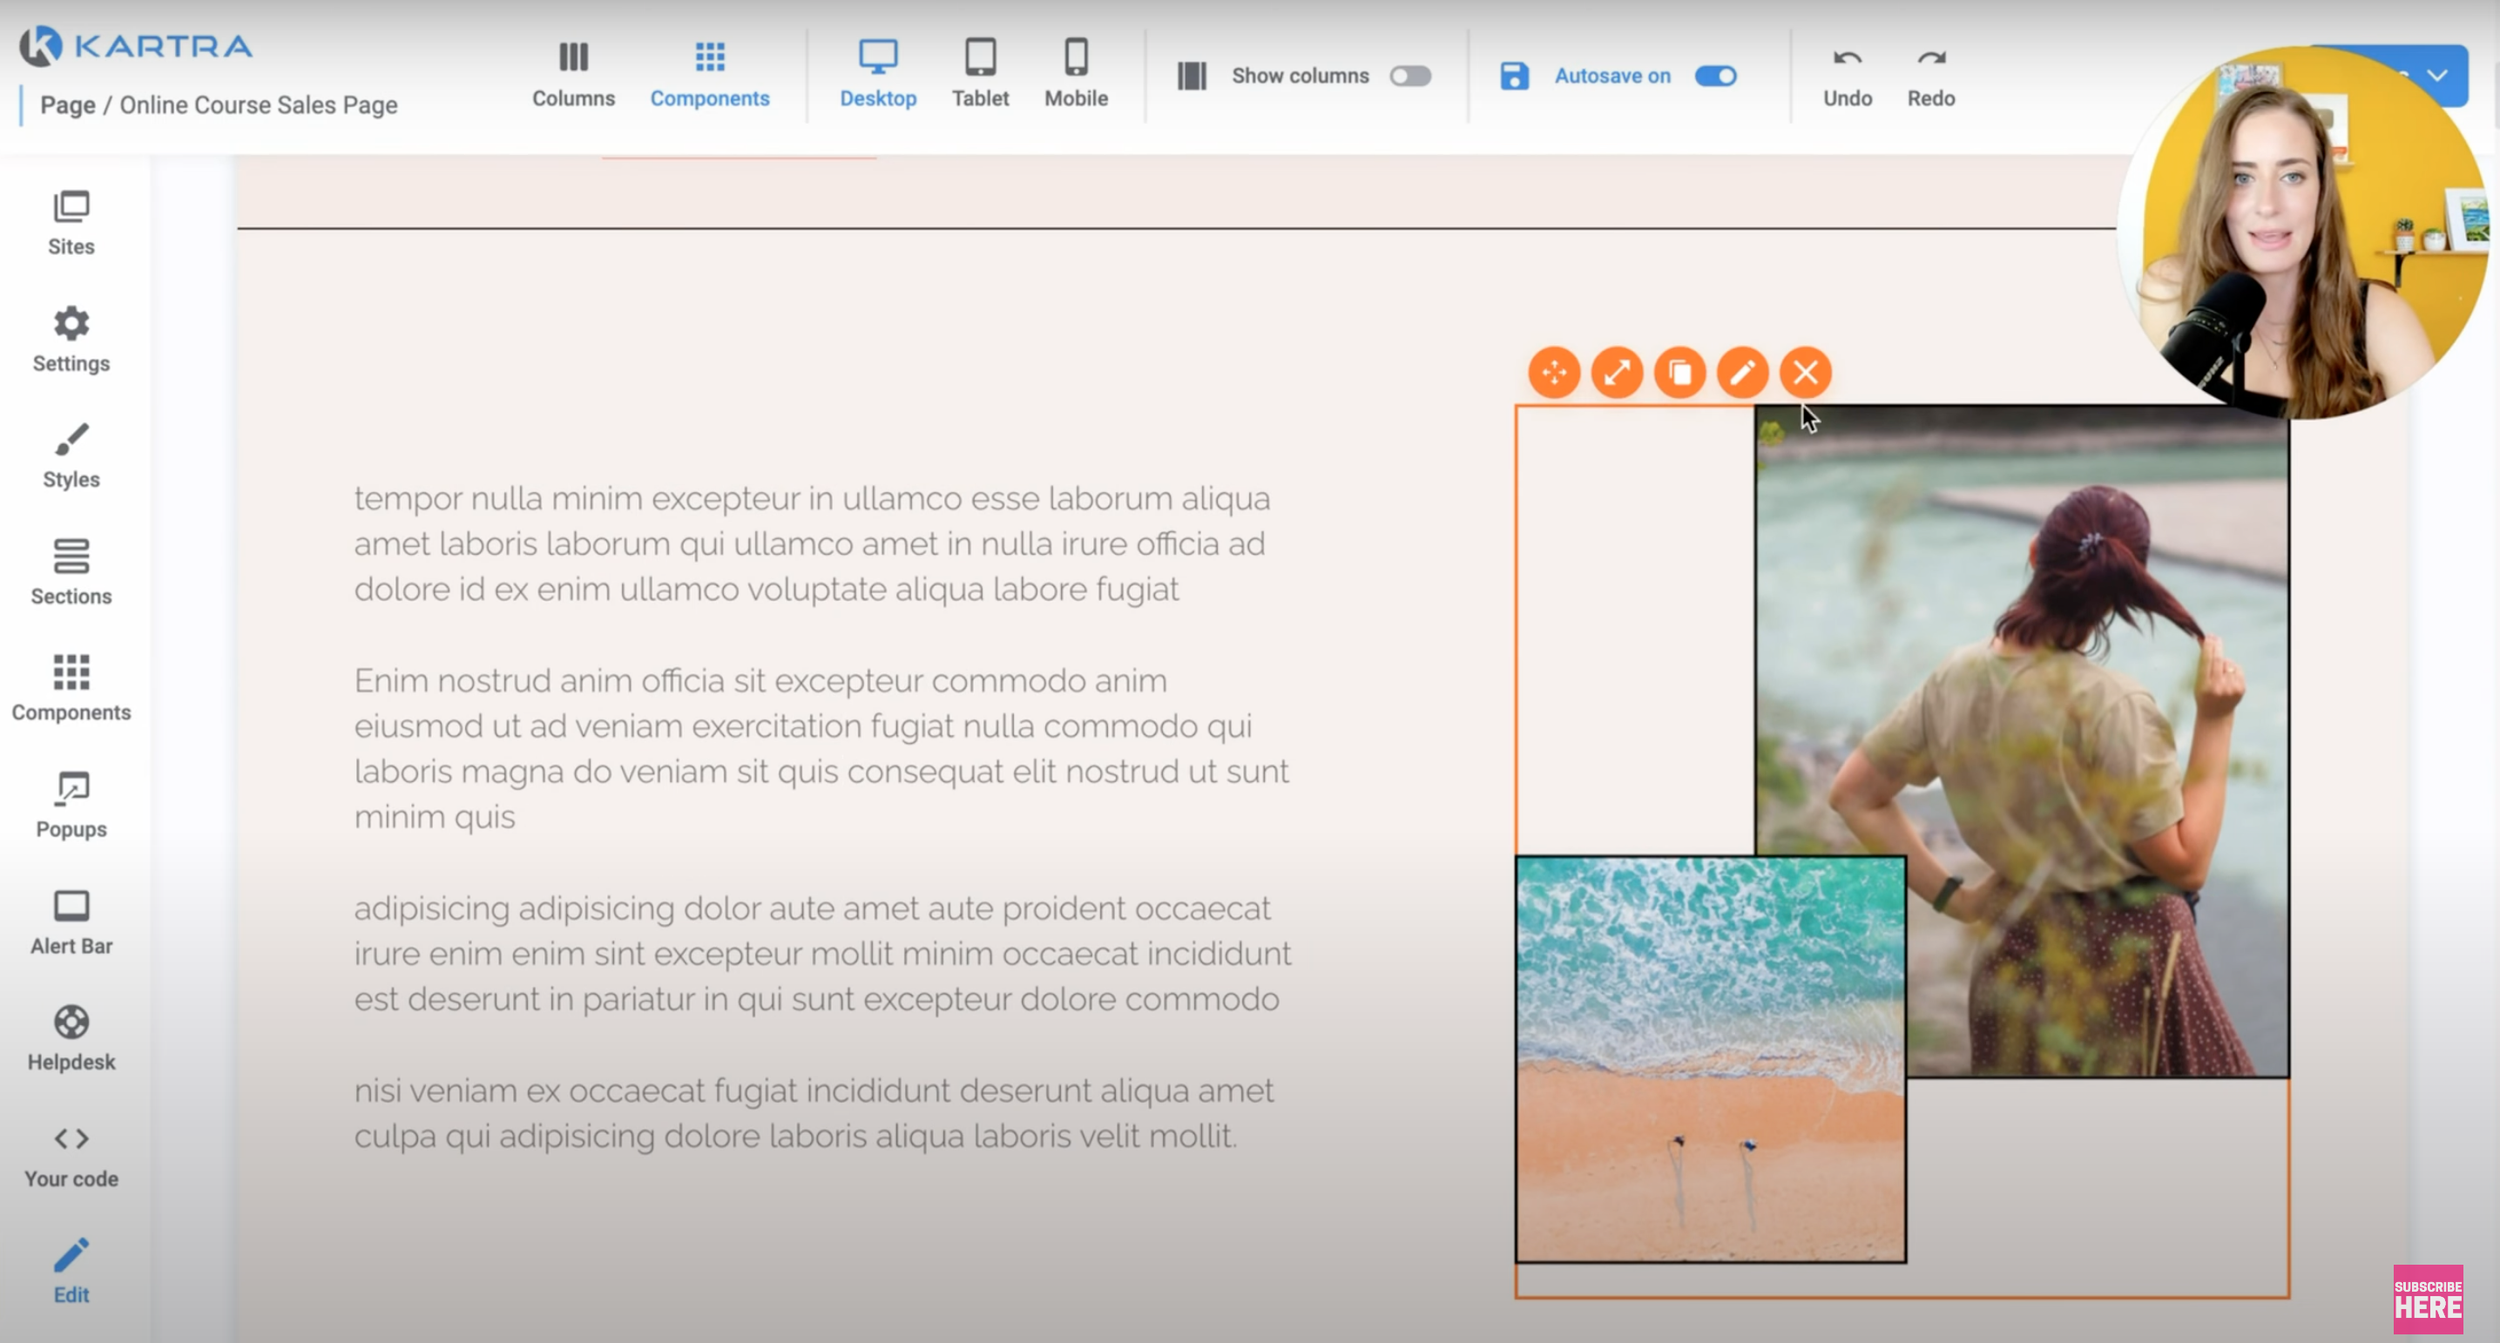
So you could go into Canva, create your own double image like this, or you can simply, you know, just choose one of their free images again.
This is gonna be such an odd, odd page. Whenever I'm demoing how to create pages. It always ends up with the strangest look, but I just wanna show you the function.
Remember to change the background, go over to the gear, click “edit”, and you could change the background colour to whatever you want.
And as you can see, literally every element I can hover over it, click on the pencil icon and customize it in some way! This definitely takes some getting used to for sure, but once you are used to it, you realize, okay, I can make this page look however I want. And that is really a nice feeling.
So that is customizing the template, but also at any point you can build your page from scratch. You can insert in new sections. To do that, you'd go to the left where it says “sections”, and you'll see if we go to “hero sections” (for example), all these different pre-built sections that we can just take and drag over to our page. Let's say I want to add one right on my page. I'm just going to drag it in. That will insert, and then I go ahead and customize that section.
You can build it that way. Or you can also, if we go to “components”, that is how you are able to just add very small individual pieces, like adding one button or adding one image.
So you really can customize everything about this page. Then if you want to see what it looks like on mobile, come up to the top and click “mobile”, and you'll be able to see that. It should honestly be pretty much ready to go as is.
So that is just a basic overview of how to use the page builder!
Then once you're done, you're gonna come up to the top and you're going to hit “publish live”. Then:

Click “get the page link”, copy this, and then to view your page open it in a new window.
This is going to be how you create any page that you need in your business from a landing page, sales page, thank you page, or just a general info page!
Kartra Membership Builder (For Courses, Memberships) 💻
Now let's go into the membership builder! So this is what you would use to host the content for your online course membership or even group program.
To create your membership, you're going to click on the plus sign and put in the title of your membership:

So you will need to link this to your sales page and upload a custom logo. I'm gonna hit save.
I'm going to set this as password protected because this is going to be a paid product. Then I’ll hit “save and next”, and then launch the builder.
Just like the rest of Kartra, this is all drag and drop as well. This is how you are going to build out your whole course. So this is where people will log in and view all of your videos.

So first things first. You're gonna go up to the top right and click on the pencil icon, and this is where you would upload your logo. Then to change the colour of this area, you can change the header and accent colour, so you can change that to whatever you want. Again, you'll add in your whole palette, so you'll have your colours easily accessible here.
I'm going to go ahead and add in my brand colour yellow that I love.
Now you're gonna come up here to this section:
Click on the pencil icon, and here's where you will add your different modules or sections. So I can click “add category”, and then I'm going to click the pencil icon and put in, let's say “module one”.
And then I'm gonna do that again. I'm gonna add another category this time for “module two”. And you would continue this process.
So I'm going to hit “save”, and now you will see that those are across the top here:
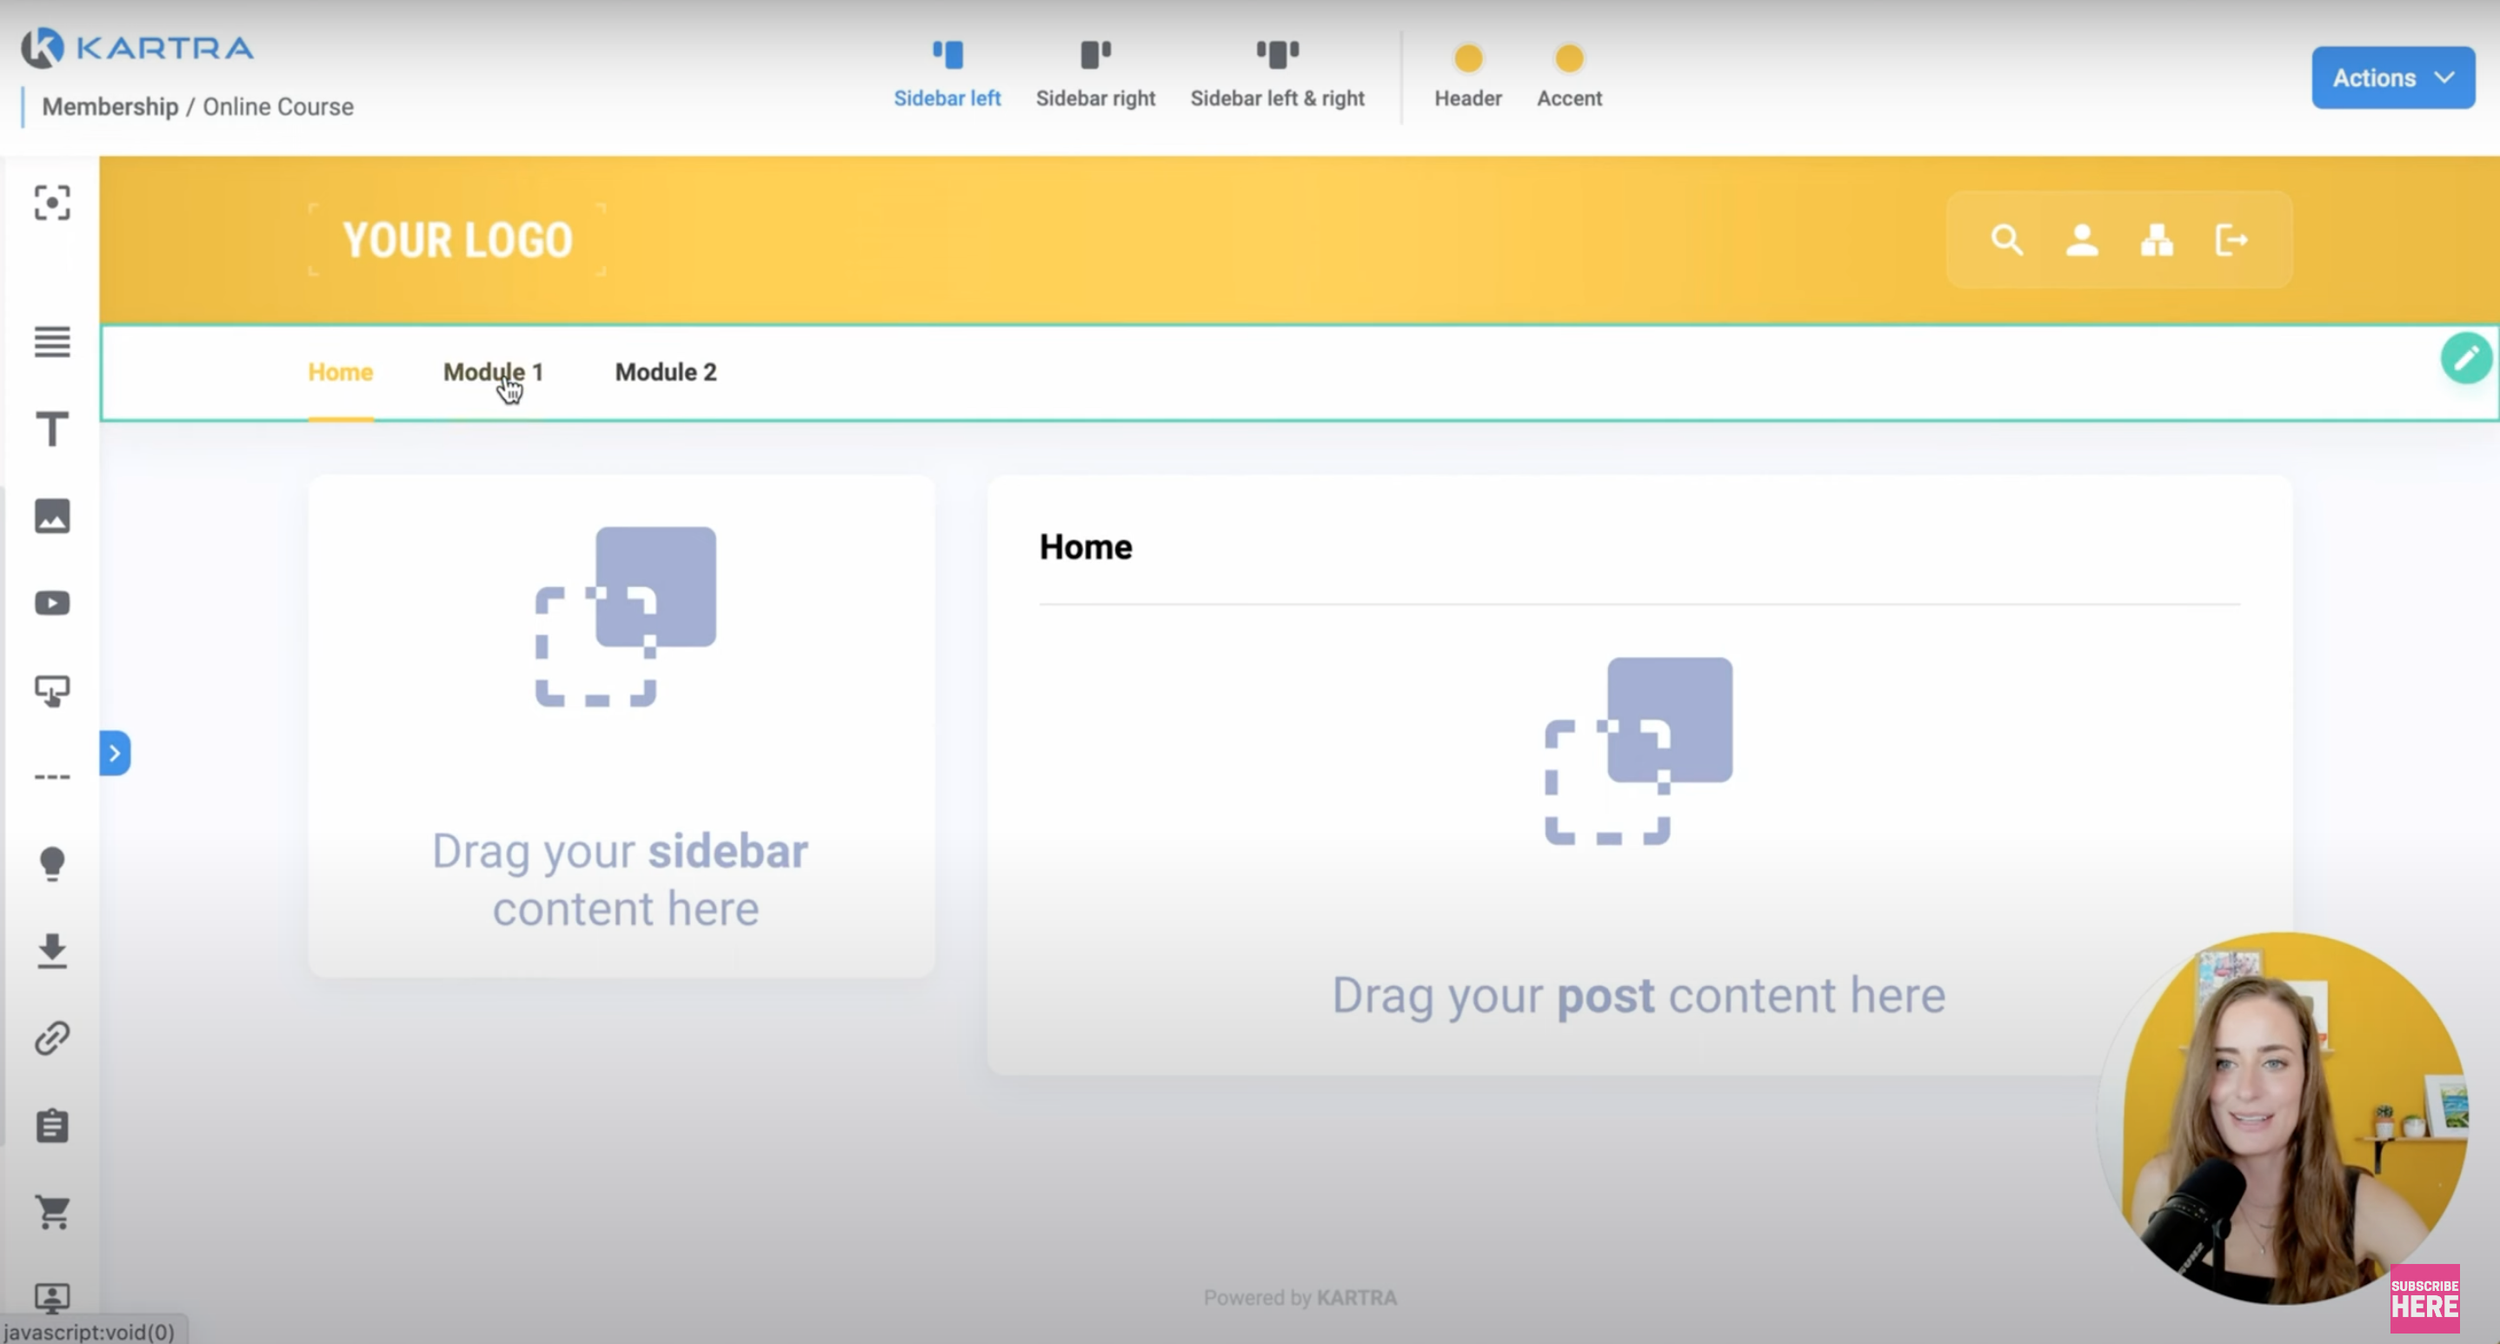
Then if we click on module one, then we need to add the individual lessons.
So for that, you're going to go to the right and you'll see this pencil icon for new post. You're going to take that and you're just going to drag it into the post contents. So this is how we would construct lesson one, and you'll see all these different icons that you can choose from.
Let's pretend this is a video lesson. I’m going to hit “save”, and then for the actual lesson itself, again, go over here to the left, scroll down and you'll see “post contents” and again, so customizable. All drag and drop.

So let's say I want to add a headline. I'm going to click that and drag it into post contents.
Or, let's say I want to add text. I'm gonna do that by clicking the “text” option. Or for a button, I’m clicking that and then dragging it in. And then of course, I can change the colour.
There's also things like highlight boxes that you can add in, so I'll often use this as like our lesson overview section:
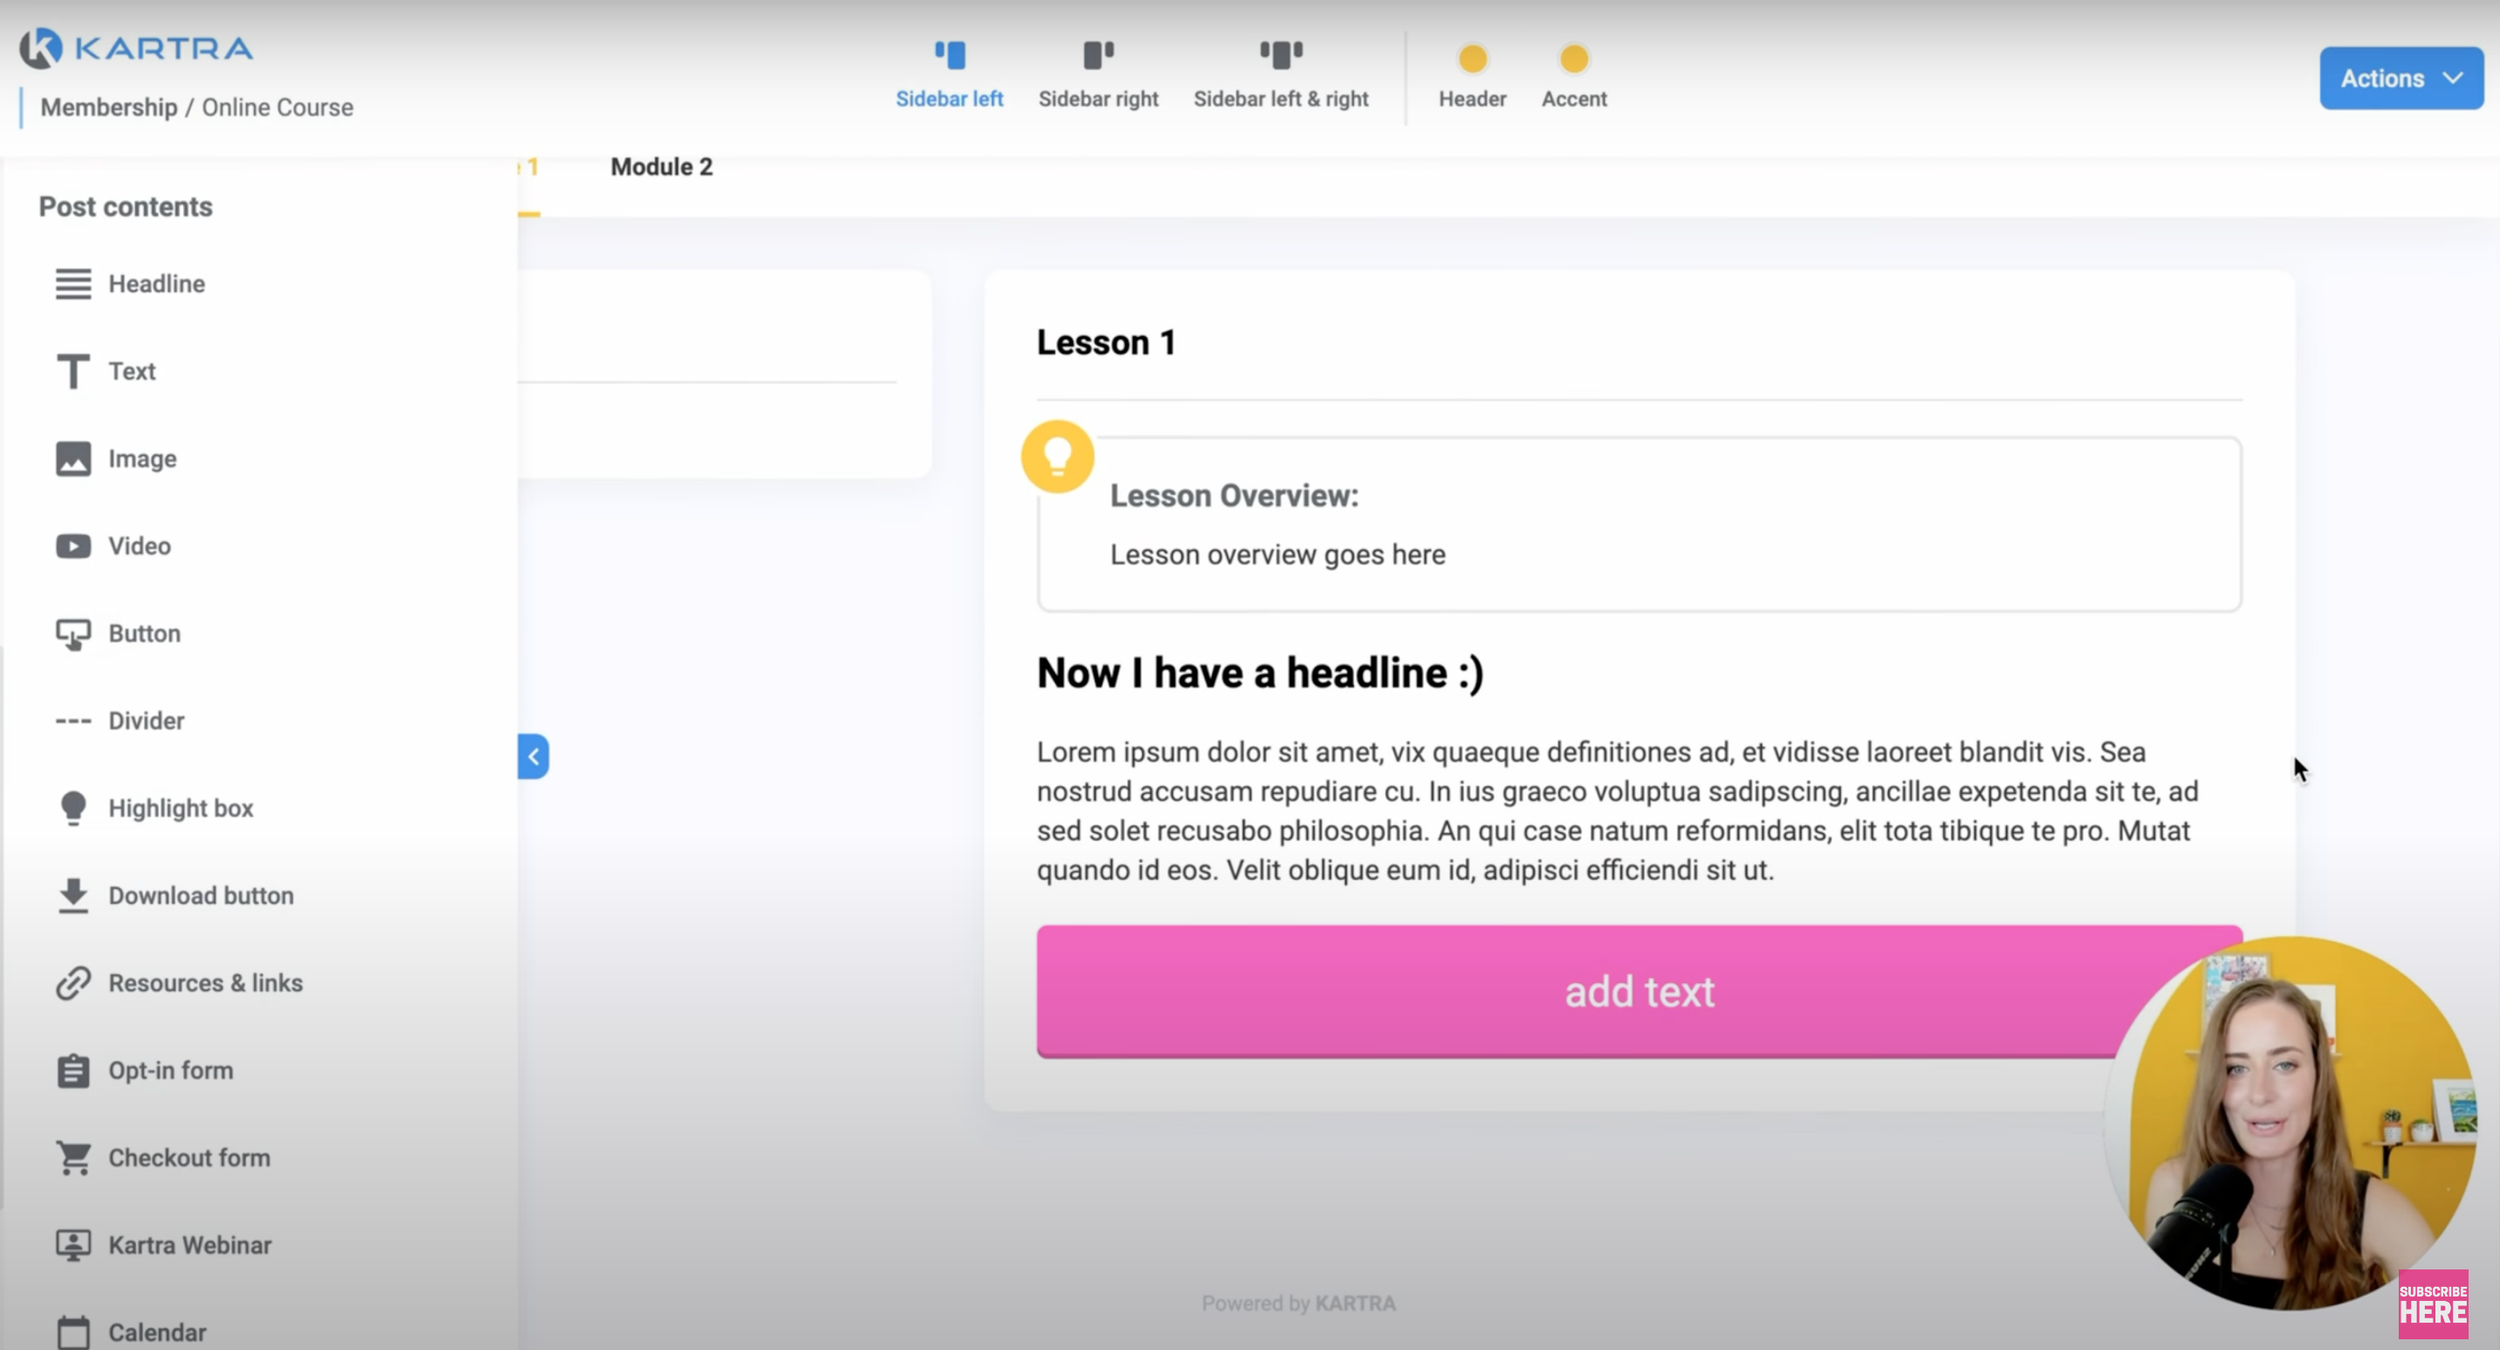
Like how great does that look right? Unlike other platforms out there that are really restrictive and only let you have one section for the download, for example, with Kartra, you can move it all around. So I can take a button and I can move it up top, or I can rearrange all of the material on the page. It's really nice and easy.
You have all of this different content that you can add in. This is exactly how you would add in your actual video lesson, and you can either upload directly to Kartra or you can embed from YouTube, Wistia, or Vimeo.
So you're gonna go ahead and you're going to build out all of your lessons. And what I would actually do is I would create a set structure for your lessons. Let's say that all of your lessons are going to follow one design, I would do that and then I would clone it.
Then we can just change this to lesson two, hit “save”. Now we have lesson two:

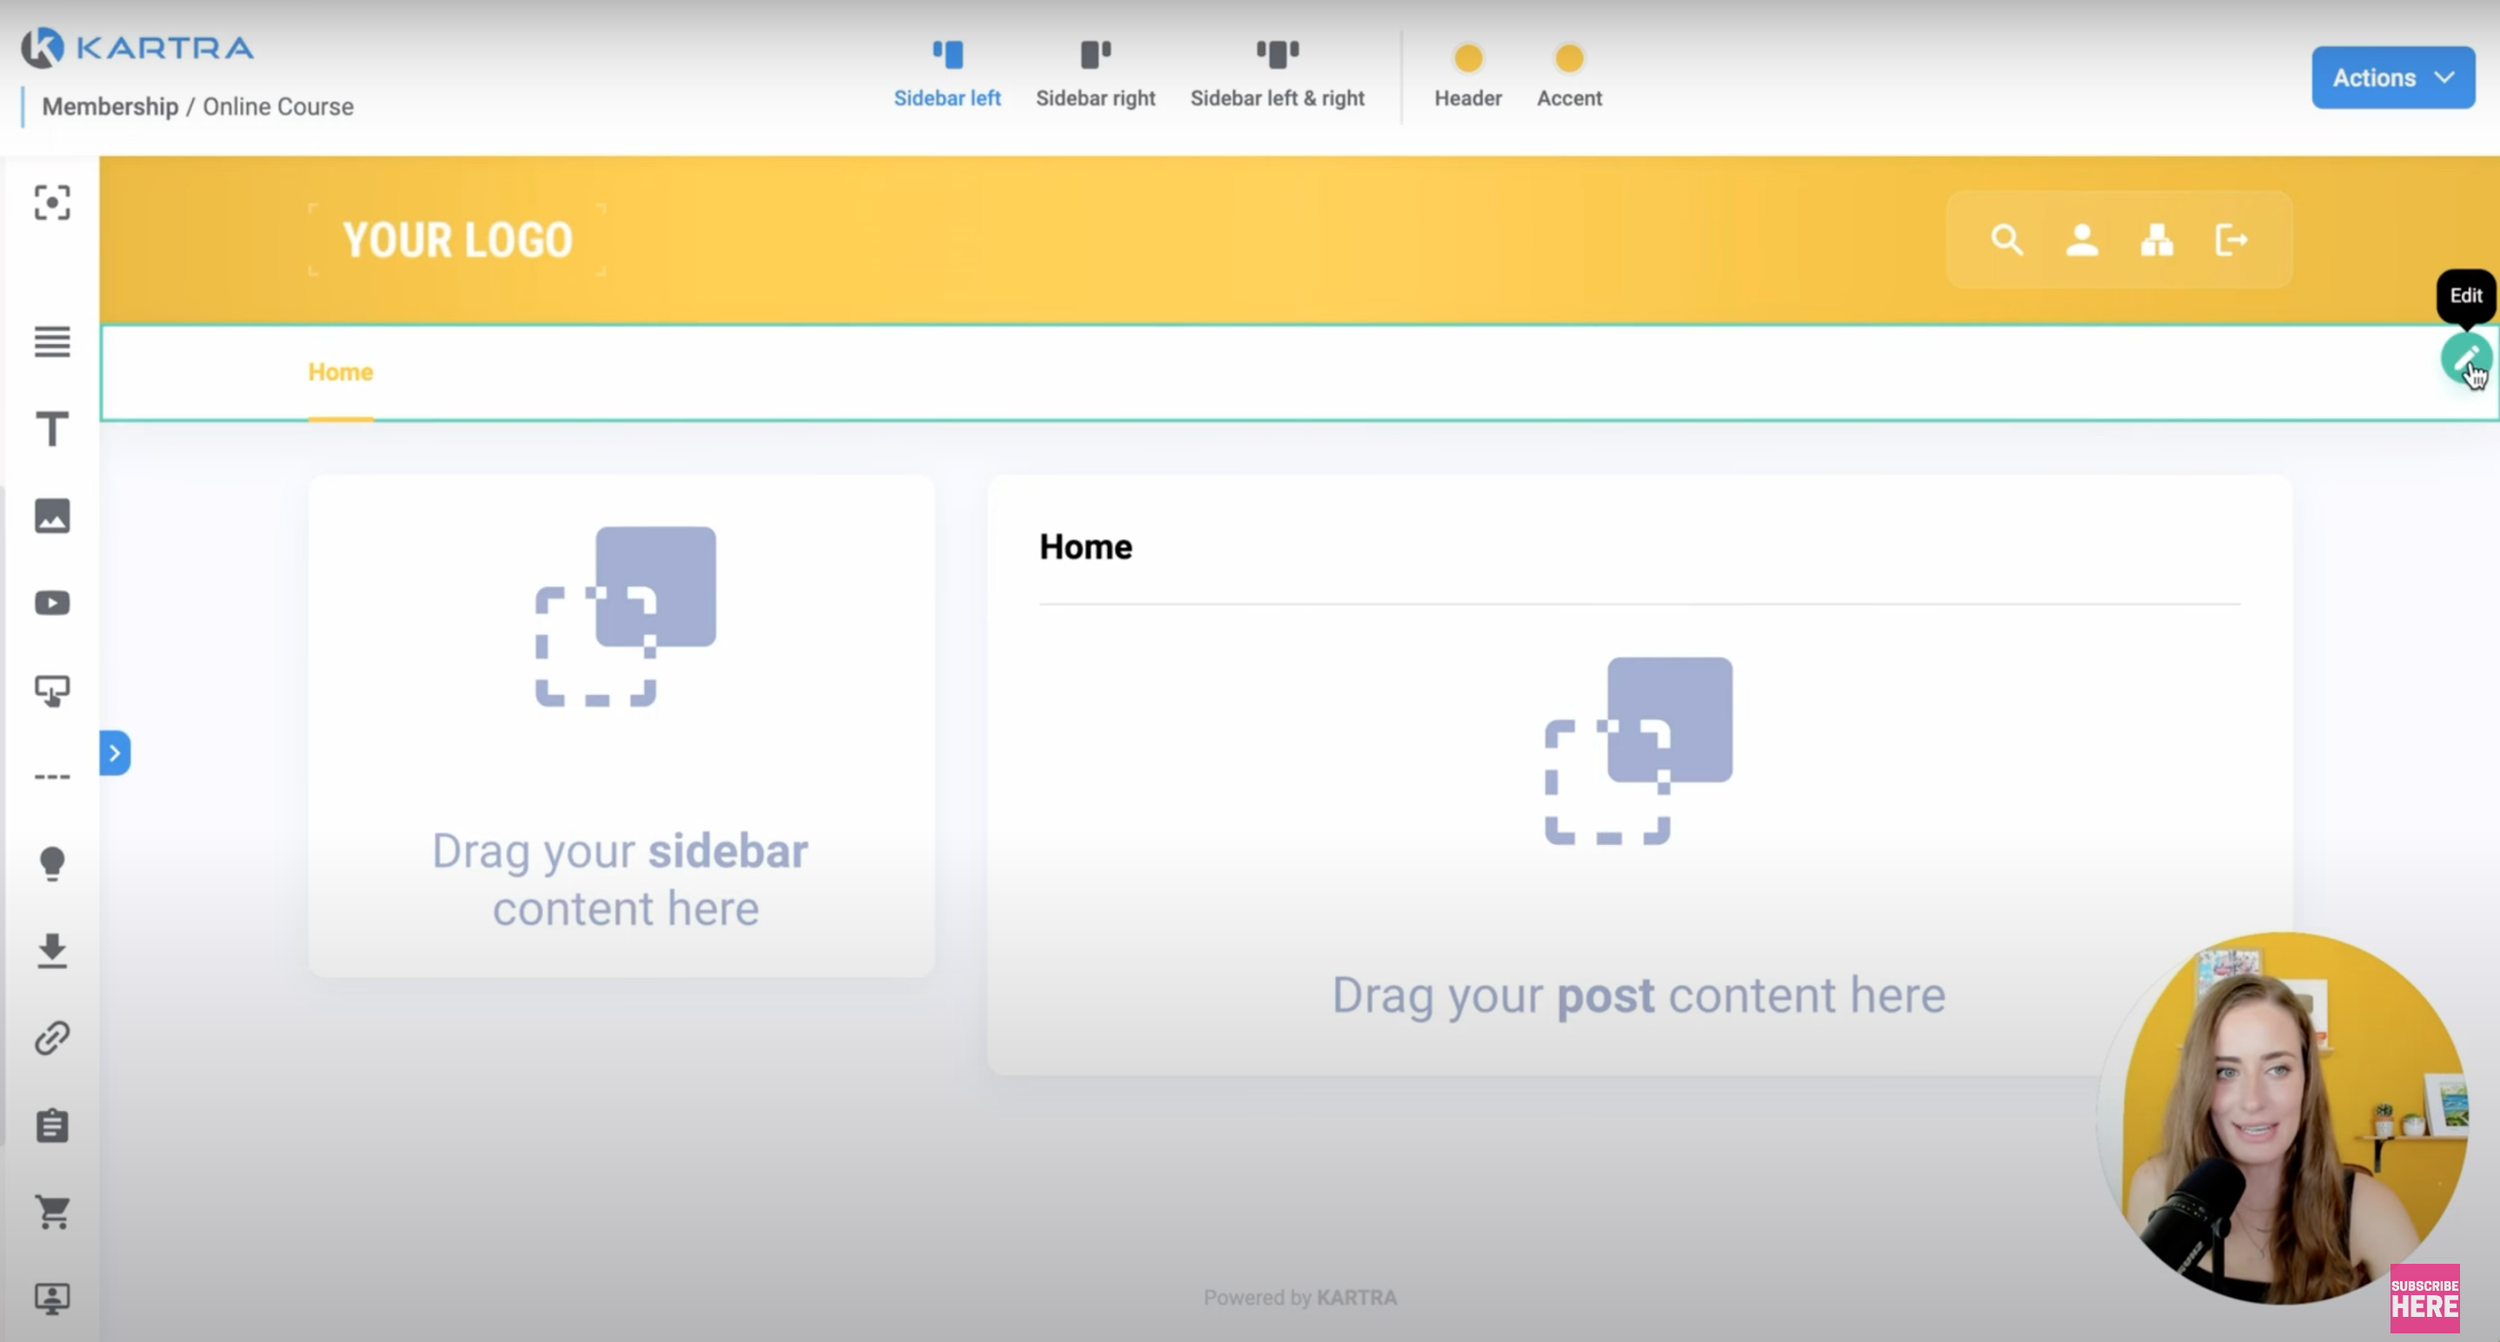
Okay, let's go back to home for a second. In your home section, you are going to want to add a little welcome note for all of your new students.
You can also build out a sidebar. So in your sidebar you can put things like your info, who you are, and I can have something like this display me. I could also include links for my social media as well. There's a lot more that you can do with that and you can change the positioning of that.
So that is the basics of how you build out all of your lessons!
Then you have a few options in terms of how this looks. So if you click this blue button top right, and then you click preview, you'll see that you have three different designs to choose from:

Right now we are on the first one. So if I click “save and preview”, you can see what that looks like.
There's so much more you can do, too. For example, you can add in a progress bar for your students. You can add in featured posts, right? There's really so much you can do.
Once you're done that come up to the top and click “save and exit”.
Then, you're going to hit save and next. Now you need to go through all of these options to determine the settings of your course overall. For example, do you want to enable comments or not?
Or, do you want to have different access levels? This is how we deliver bonuses.

And we could have another level which gives them access to additional bonuses, additional lessons.
You can choose whether to display a progress bar across the bottom of your course.

You can add the help desk feature.
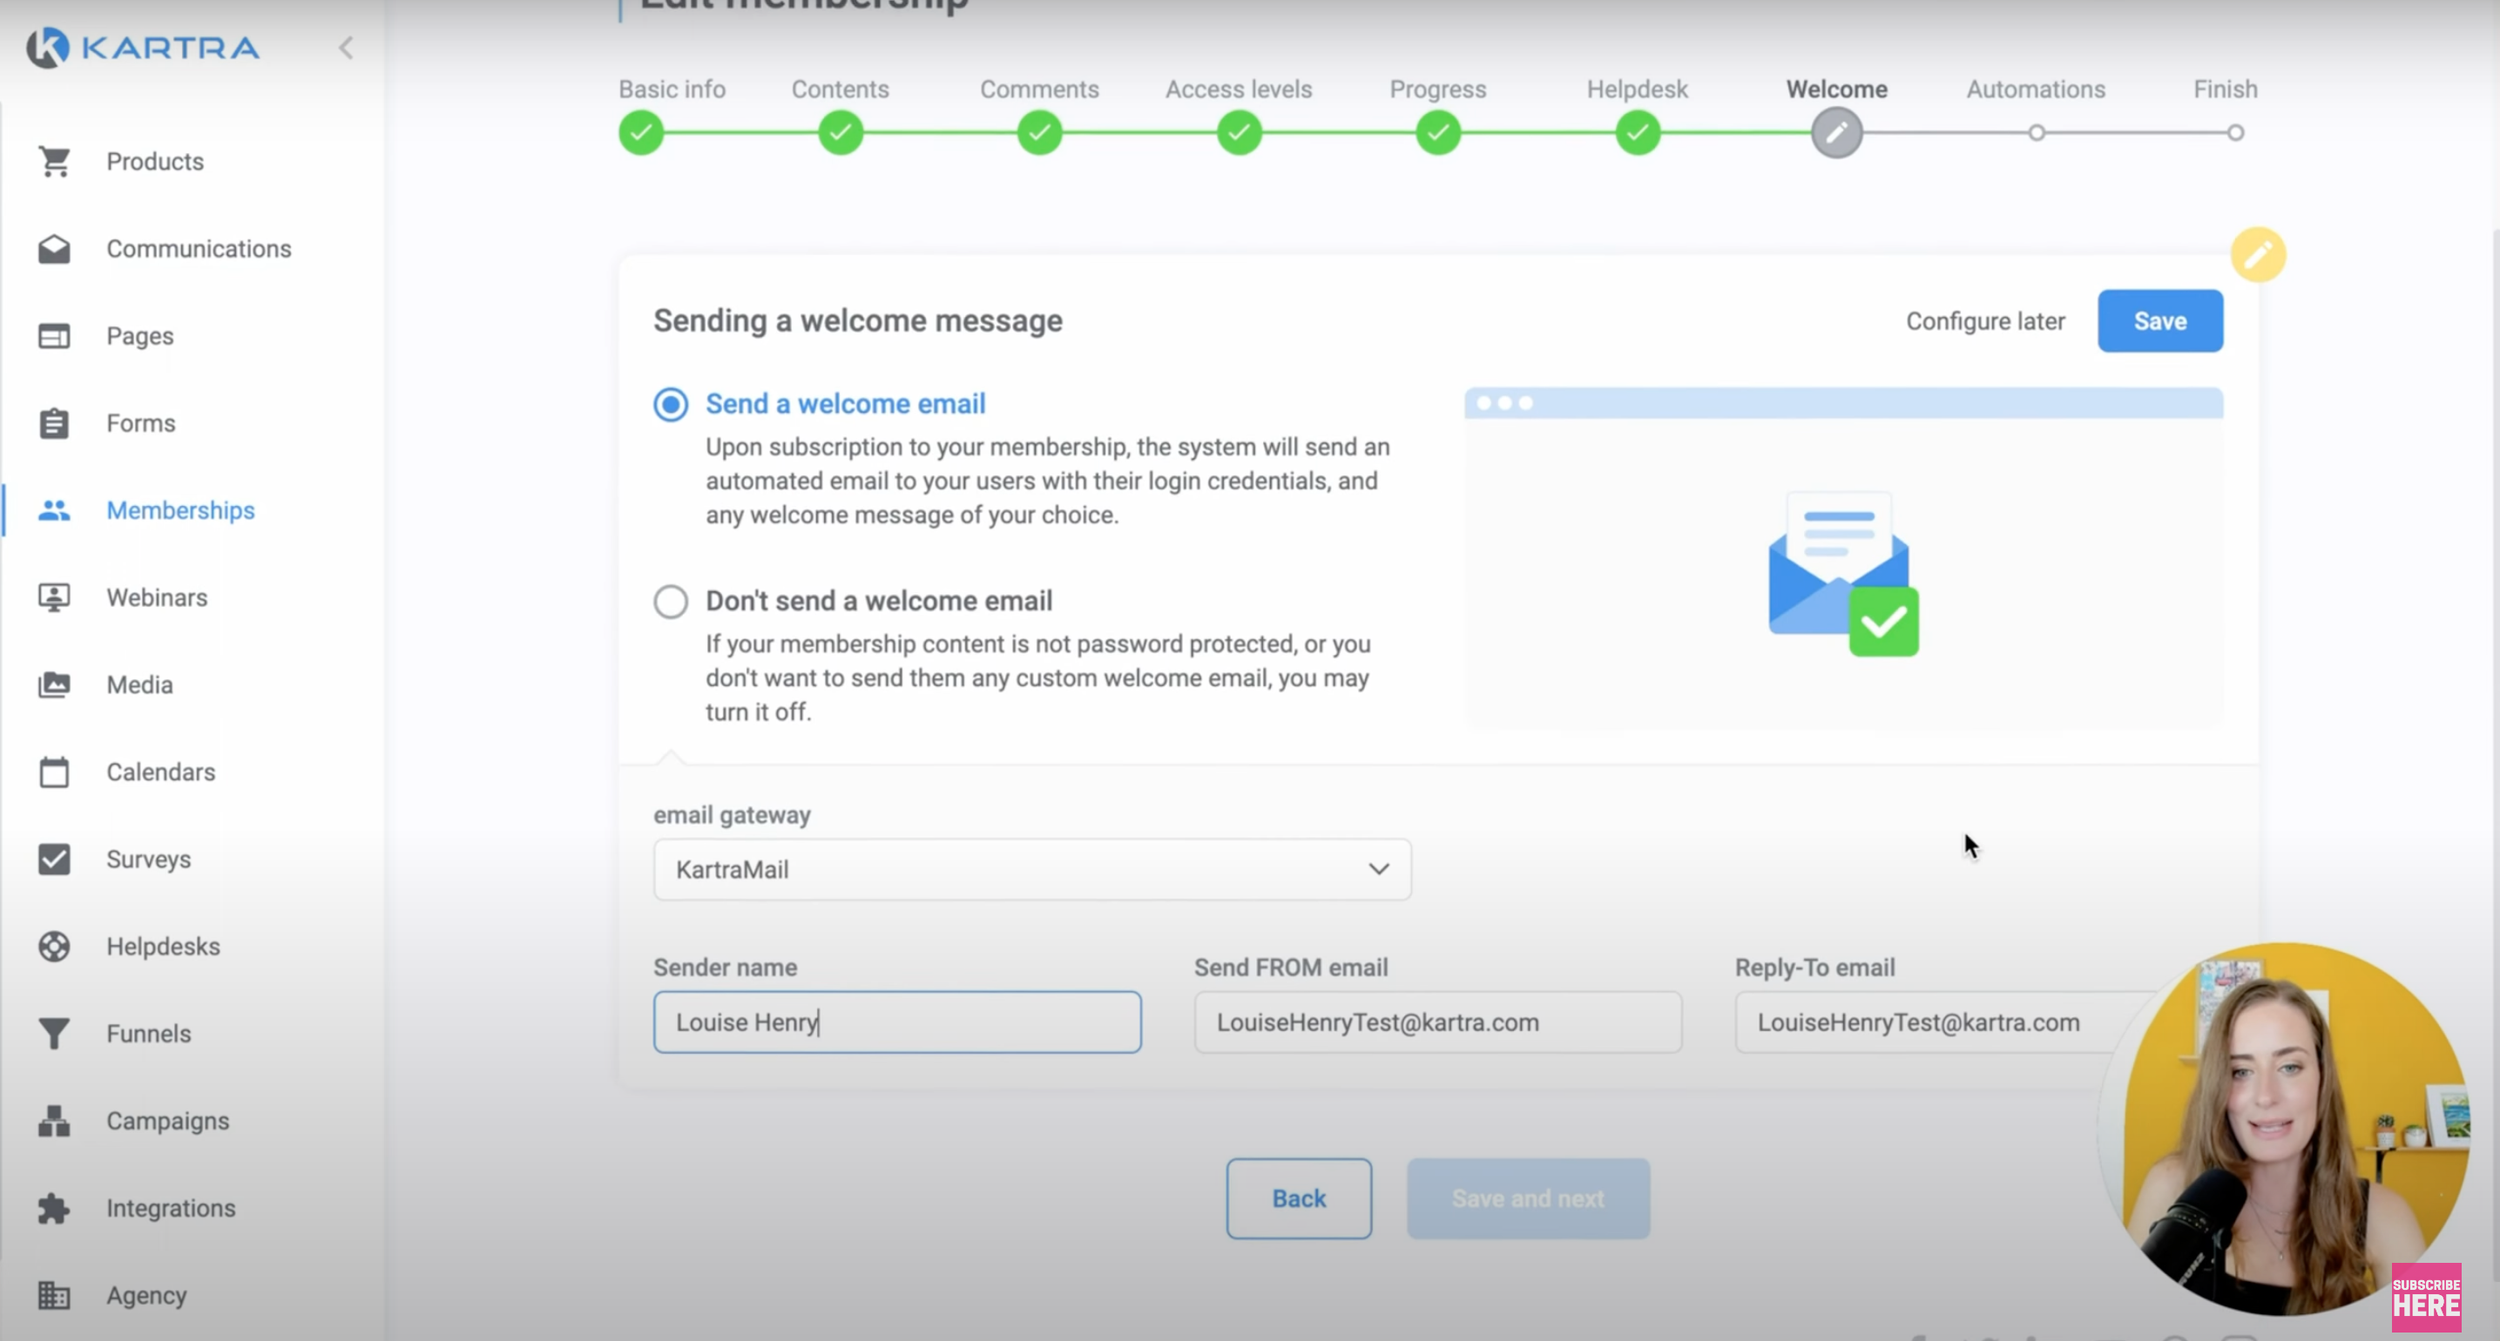
Something you definitely want to customize is the welcome email that people get when they first join your course. So you want to customize this because it will automatically send out the login page, email and password.
And add any additional automations that you want to add.
Then, the next step is just making sure that this is all connected and that everything functions correctly, so that when you purchase the product, you get access to this online course and you get the right emails.
What's really powerful about this is you're going to be able to automate a lot of your online business and free you up from the day to day. 🎉
This is actually what I teach inside my program, Passive Profit Accelerator.
That's where I show you everything click-by-click. So if you need more support with this, definitely check this out!
There's so much more that you can do with Kartra. So make sure that you hit subscribe to my channel because I will be sharing more videos on Kartra.
So that is how you get started with Kartra in 2023! Don't forget to grab my free roadmap down and to use that link for the 30 day Kartra trial.
Thank you so much for watching! If you have any questions at all about Kartra and what this tool can do for your business, just send me a message, and I'll see you real soon with another video!
GET YOUR FREE ROADMAP HERE:


Save time & mental energy by setting up Asana rules!